MAUI Hybrid Launcher for OpenSilver
Starting with OpenSilver 3.2, you can now run your OpenSilver applications not only in the browser but also as semi-native apps on macOS, Windows, Android, and iOS. Additionally, you can publish these apps to major app stores, including: Google Play, Apple App Store, and Windows Store. This multi-platform capability is enabled by our support for the new MAUI Hybrid Launcher.
Overview
The MAUI Hybrid Launcher bridges OpenSilver with the native capabilities provided by .NET MAUI.
This means you get the best of both worlds:
- Web-based UI: Develop with familiar OpenSilver paradigms. The UI is rendered via a WebView, ensuring pixel-perfect consistency accross all platforms. An additional benefit of the WebView is the ability to mix and match XAML and HTML/JS-based UI components, allowing to leverage the large JS ecosystem in addition to the C#/XAML one.
- Native integration: Leverage platform-specific features and publish to app stores. The C# code is compiled to native, allowing to call native platform APIs without the need for interops.
It is the same approach that is used by Blazor Hybrid, except that the UI code is XAML/C# instead of HTML/CSS/C#.
Prerequisites
Before you get started, ensure you have the following installed:
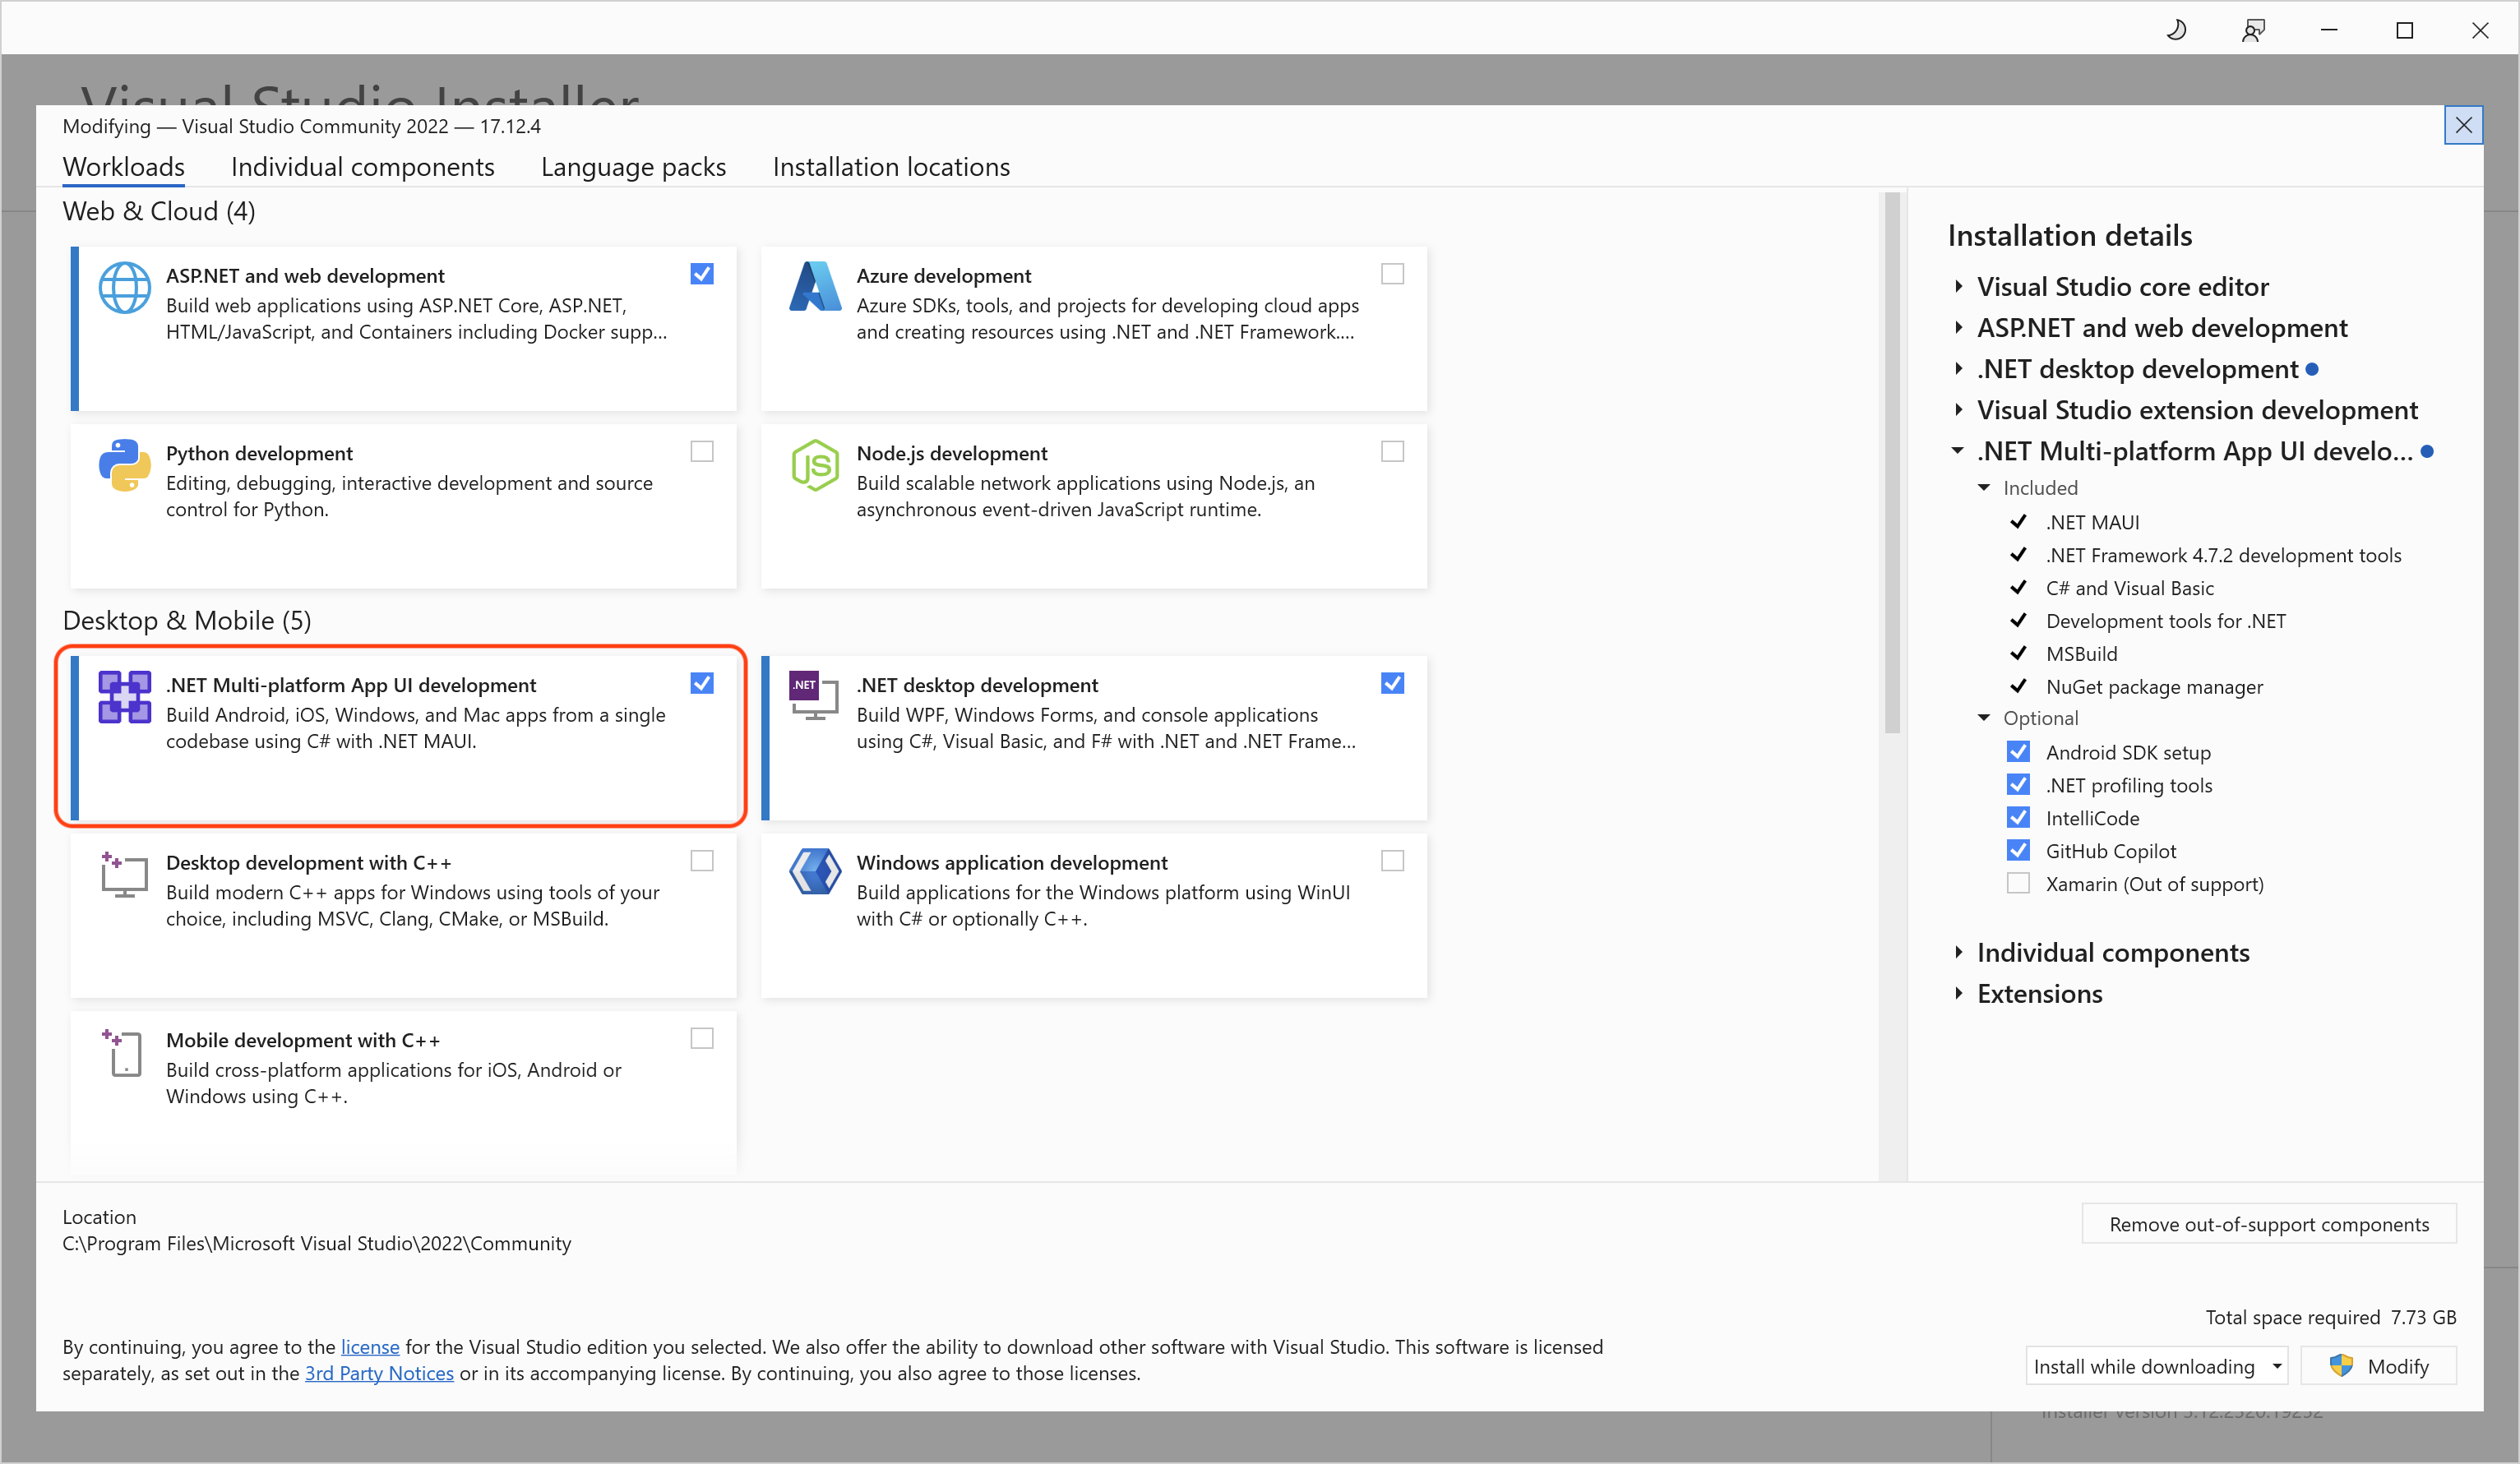
Visual Studio 2022 or later with the ".NET Multi-platform App UI development" component installed.
One of the following OpenSilver tools:
Creating an OpenSilver Application with MAUI Hybrid Launcher
You can create a new OpenSilver application with the MAUI Hybrid Launcher using either the command line, Visual Studio 2022, or Visual Studio Code.
1. Via Command Line
Open your terminal and run one of the following commands:
For all supported MAUI Platforms:
dotnet new opensilverapp -o MyAppName --mauiPlatforms allFor specific MAUI Platforms (e.g., Android and Windows):
dotnet new opensilverapp -o MyAppName --mauiPlatforms android windows
Note: The Browser launcher is always included by default.
After running the command, a new OpenSilver application will be generated with an additional .MauiHybrid launcher project. You can then open and continue developing your application in your favorite IDE.
2. Via Visual Studio 2022
- Install the OpenSilver extension.
- Start by creating a new OpenSilver project.
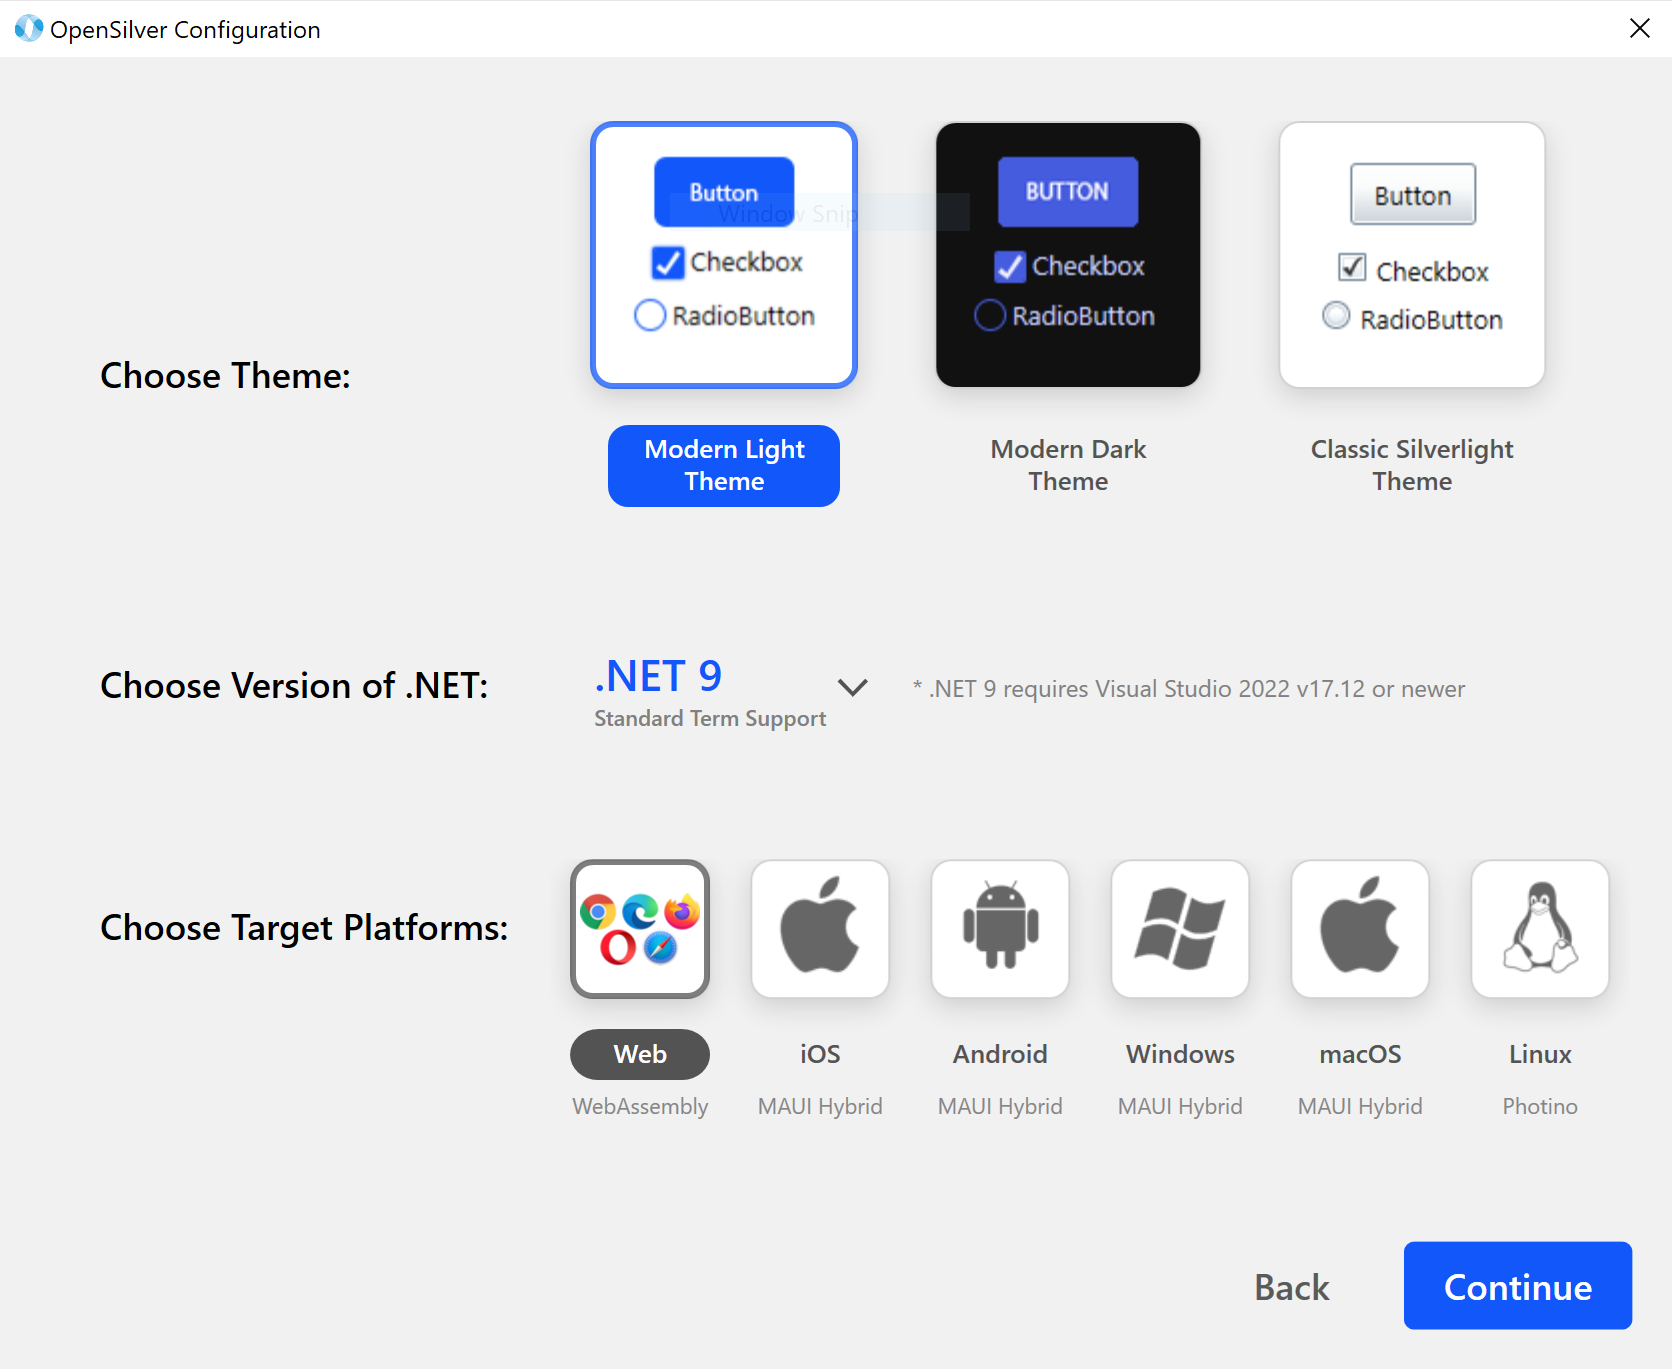
- In the project creation wizard, you will see an additional configuration panel to select the desired MAUI Platforms.
- Choose the platforms you wish to target and complete the wizard.
3. Via Visual Studio Code
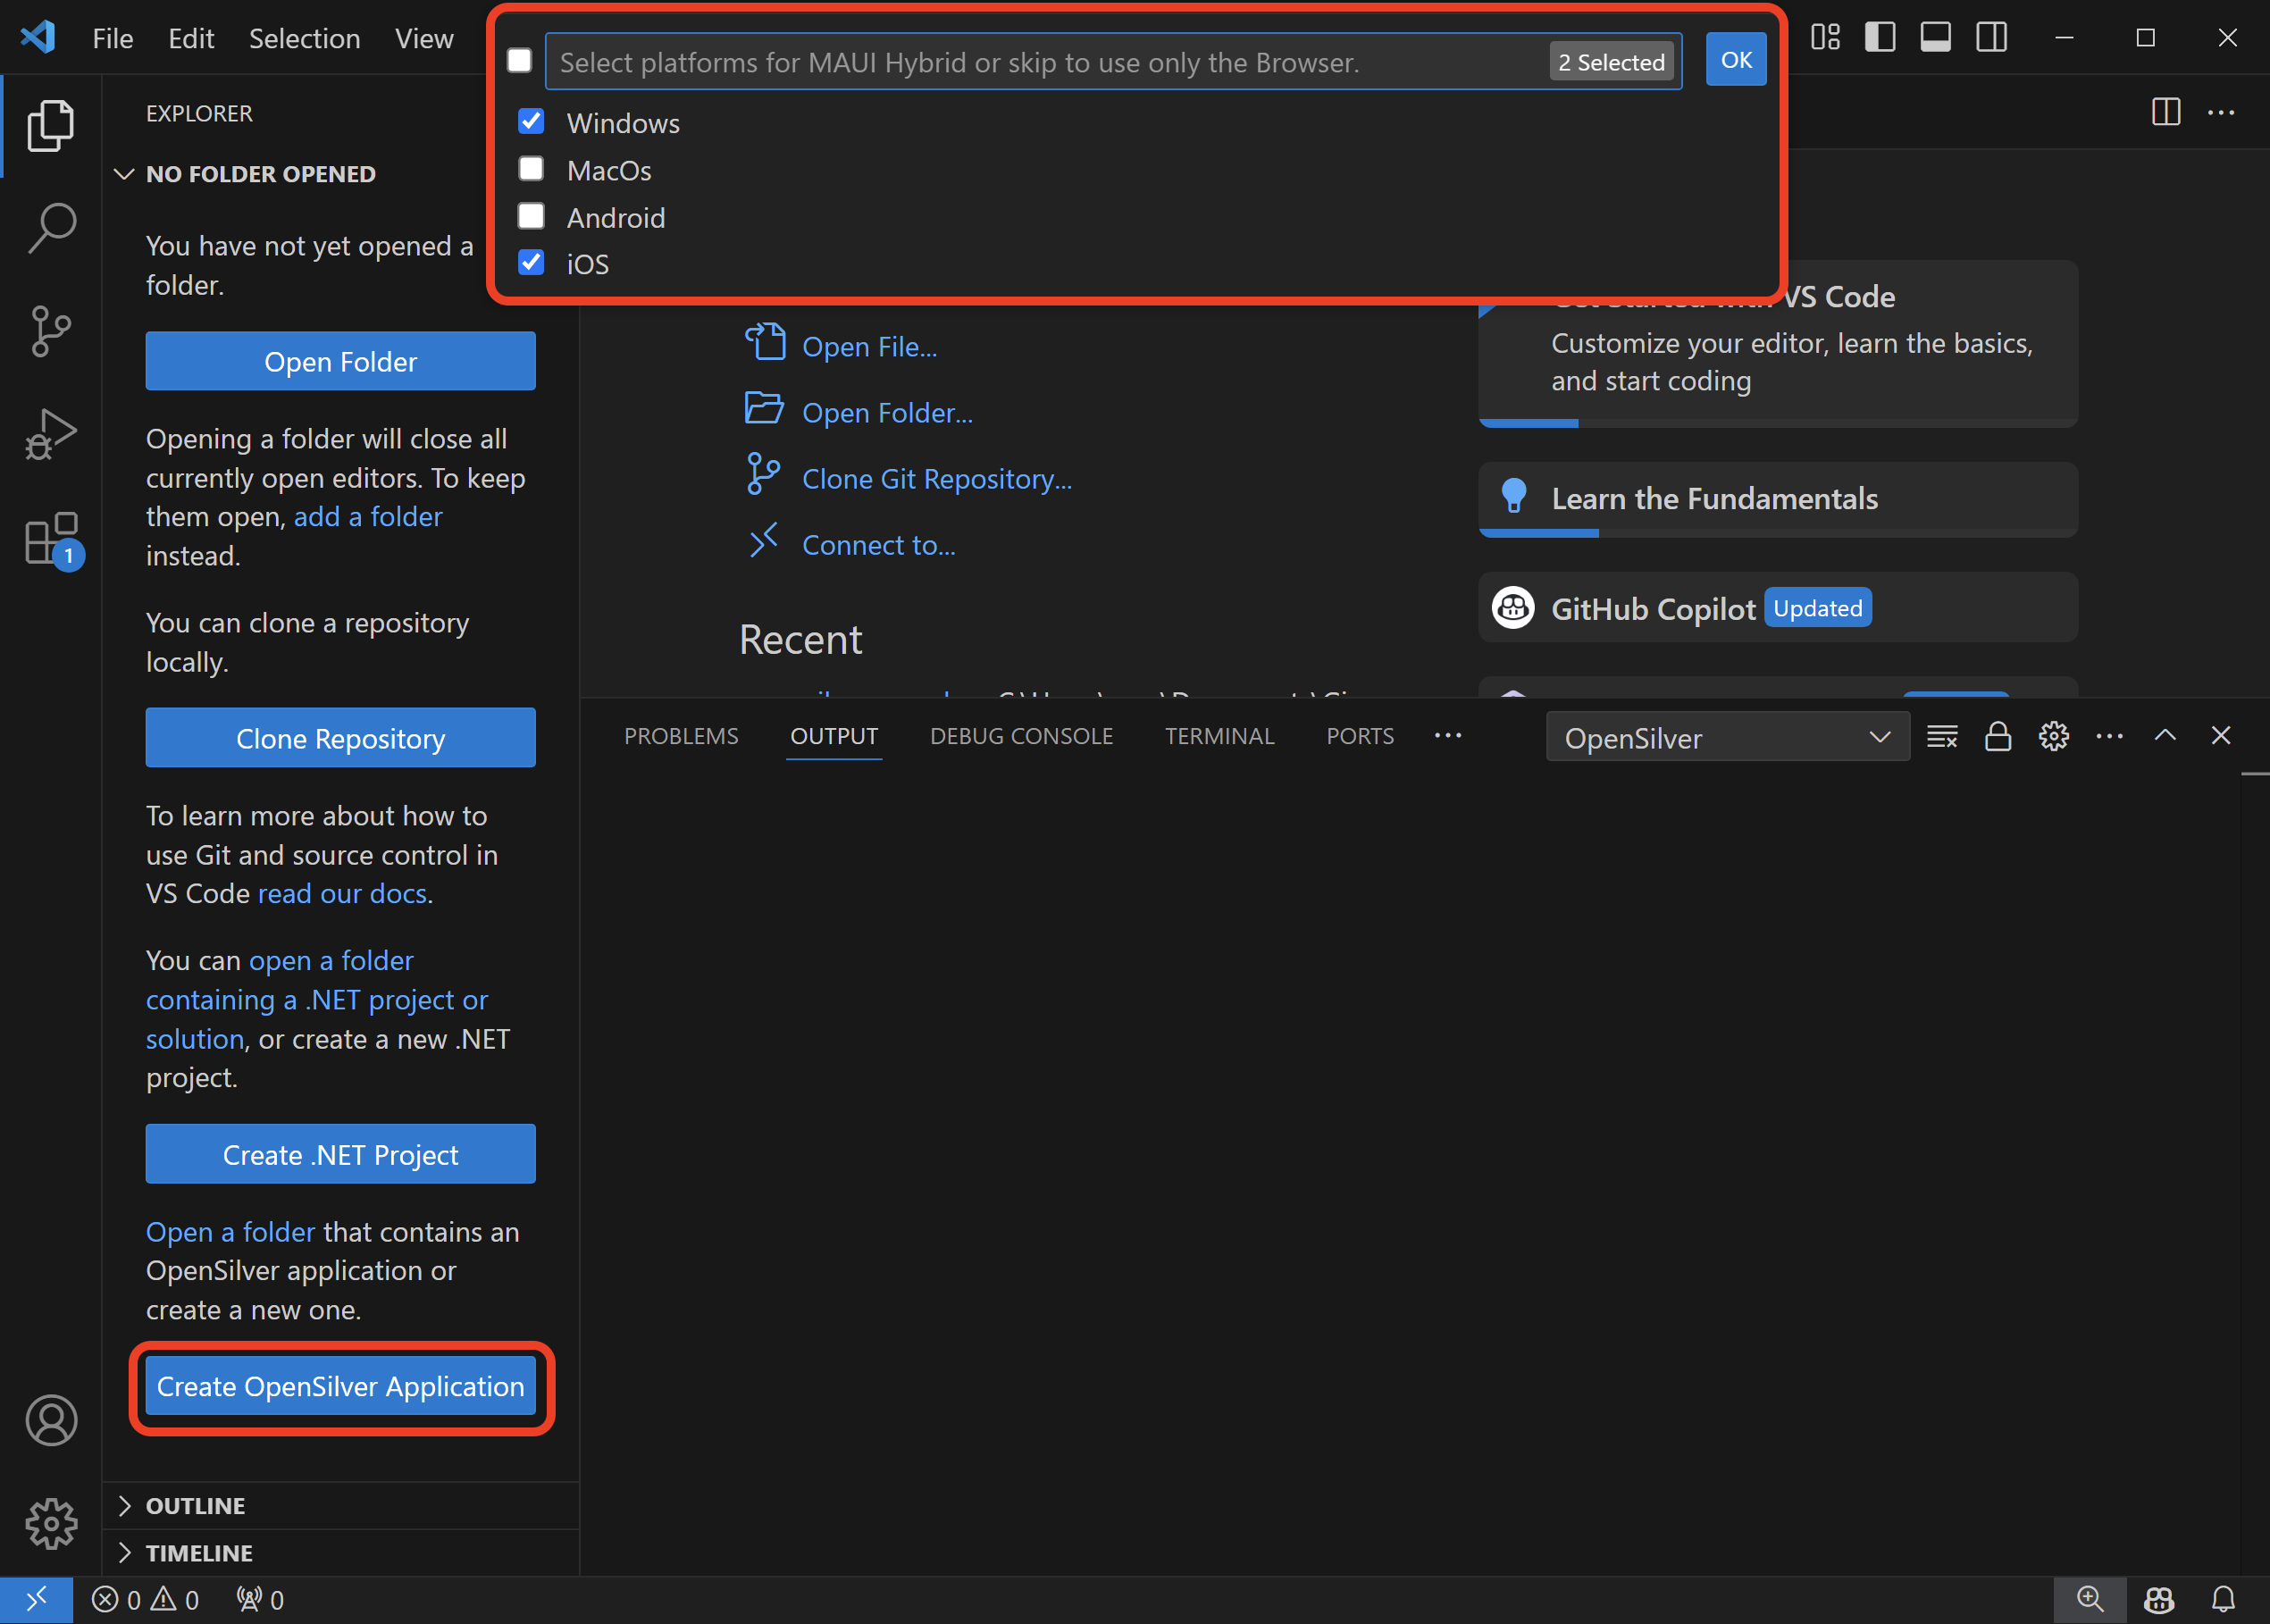
- Install the OpenSilver extension.
- Initiate the creation of a new application.
- When prompted, select the MAUI Platforms you want to include.
- If you choose not to select any platforms, the generated OpenSilver application will not include the MAUI Hybrid Launcher.
Running the MAUI Hybrid Launcher
To run your OpenSilver application using the MAUI Hybrid Launcher, follow these steps:
- Set the Startup Project: Choose the
.MauiHybridlauncher as the startup project in your solution. - Select the Target Platform: Ensure you have selected the appropriate target platform before running the application.
- IDE Recommendations:
- For macOS, we recommend using Visual Studio Code with the OpenSilver extension, along with .NET Meteor or .NET MAUI extensions for enhanced development experience.
- For Windows, we recommend using Visual Studio 2022 with the OpenSilver extension.
Running on Windows (Example)
To run your generated application as a native Windows desktop app:
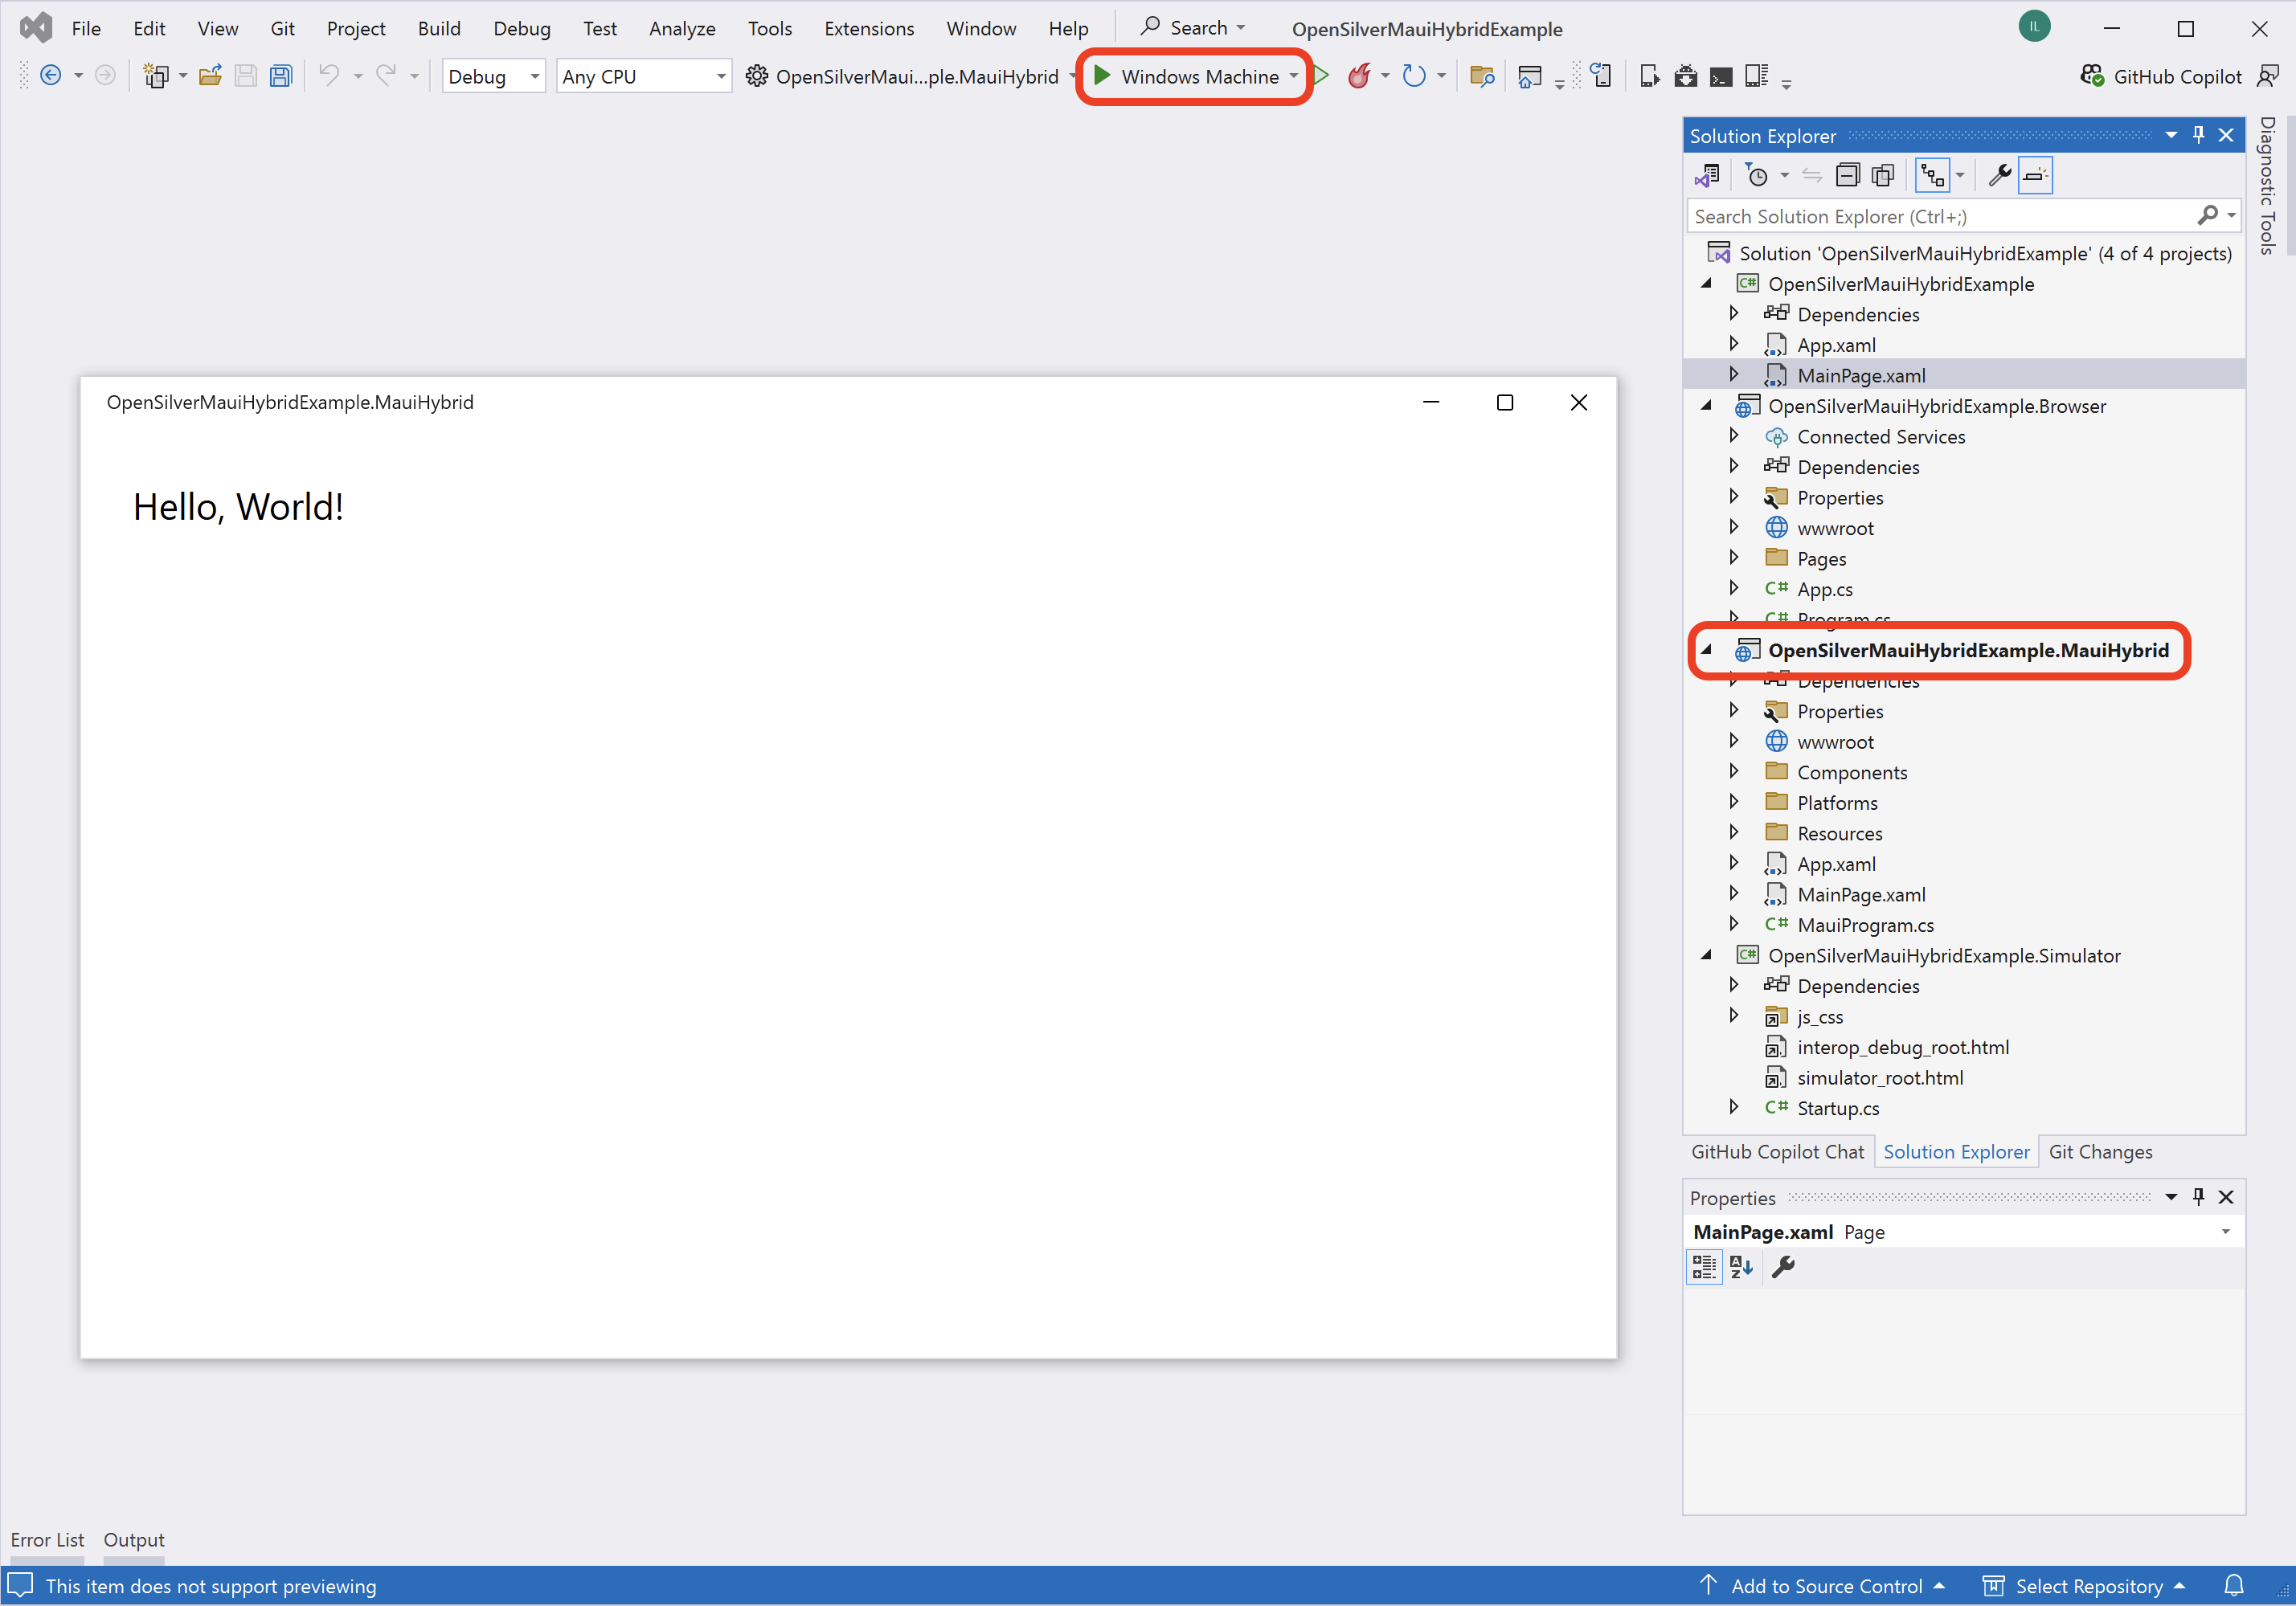
- Set the Startup Project:
- In your solution, choose the
.MauiHybridproject as the startup project.
- In your solution, choose the
- Select the Target Platform:
- Make sure that "Windows" is selected as your target platform.
- Run the Application:
- Click the run button (or press F5) to launch the app.
Running on mobile devices (Android/iOS)
You can run your application on a connected Android device or in emulator.
To run a MAUI app on a local iOS device from Visual Studio on Windows, follow the steps in this Microsoft doc. Please note that publishing iOS apps still requires a Mac.
Leveraging MAUI Native Features
One of the strengths of the MAUI Hybrid Launcher is that it gives you access to native features via .NET MAUI. For example, the Microsoft.Maui.Essentials package provides APIs for accessing device hardware and native functions.
Note: Ensure that the package version aligns with your .NET version. For example, if your application targets .NET 8, use Microsoft.Maui.Essentials 8.0.100.
Thread Considerations
OpenSilver’s core logic runs on its own dedicated thread, while many native operations require execution on the MAUI UI thread. Use MainThread.BeginInvokeOnMainThread from the Microsoft.Maui.Essentials package to marshal calls onto the MAUI UI thread.
Example: Accessing User Location
Below is an example demonstrating how to request location permissions, obtain the user’s location, and update the UI:
// Run the native API calls on the MAUI UI thread.
MainThread.BeginInvokeOnMainThread(async () =>
{
    // Check the current location permission status.
    var status = await Permissions.CheckStatusAsync<Permissions.LocationWhenInUse>();

    // If permission is not granted, request it.
    if (status != PermissionStatus.Granted)
    {
        status = await Permissions.RequestAsync<Permissions.LocationWhenInUse>();
    }

    // If permission is granted, fetch the location.
    if (status == PermissionStatus.Granted)
    {
        var request = new GeolocationRequest(GeolocationAccuracy.Medium);
        var location = await Geolocation.Default.GetLocationAsync(request);

        if (location != null)
        {
            // Switch back to the OpenSilver thread to update the UI.
            Dispatcher.BeginInvoke(() =>
            {
                TB.Text = location.ToString();
            });
        }
    }
    else
    {
        // Inform the user if permission was denied.
        Dispatcher.BeginInvoke(() =>
        {
            MessageBox.Show("Location permission denied.");
        });
    }
});
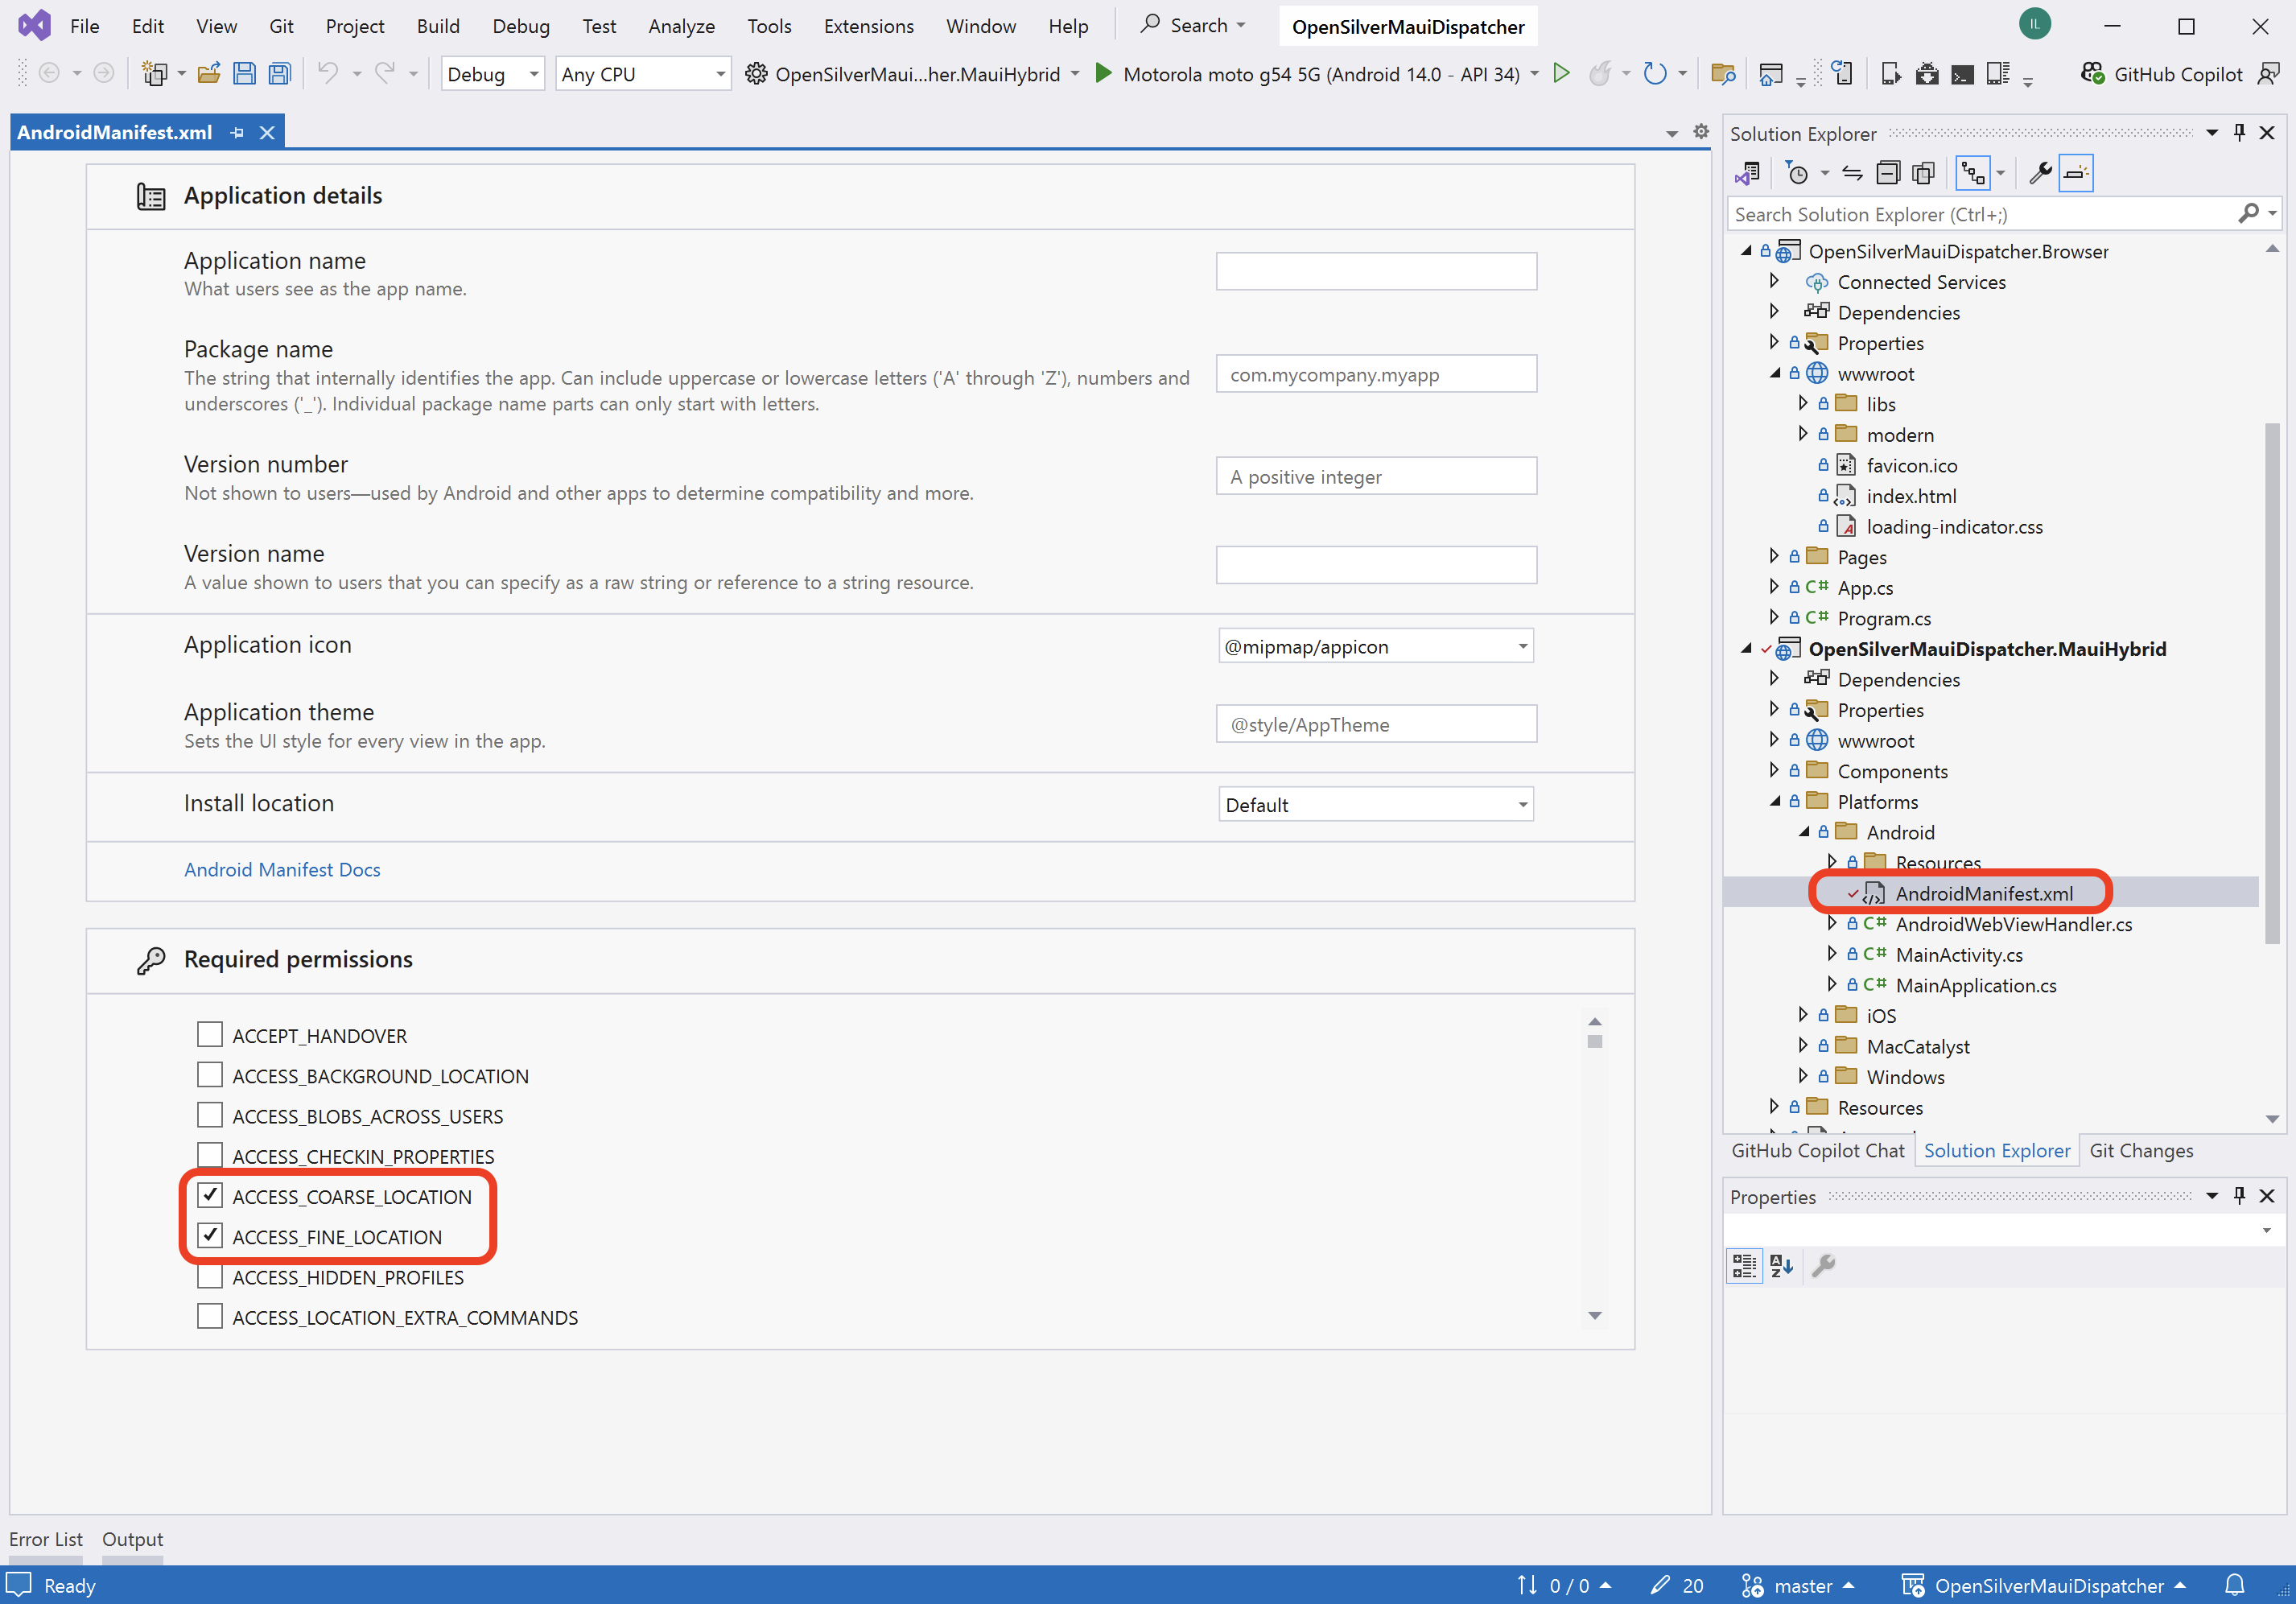
Important: Ensure proper permissions are configured for all platforms. For example, for Android, add the following permissions to
AndroidManifest.xml:
ACCESS_COARSE_LOCATIONACCESS_FINE_LOCATION
Publishing to App Stores
Since OpenSilver leverages the official MAUI Hybrid technology, you can follow the standard publishing processes provided by Microsoft. Below are detailed steps and hints for publishing to each platform.
Android
Step 1: Rebuild the solution:
- Make sure your solution builds correctly before starting the publish process.
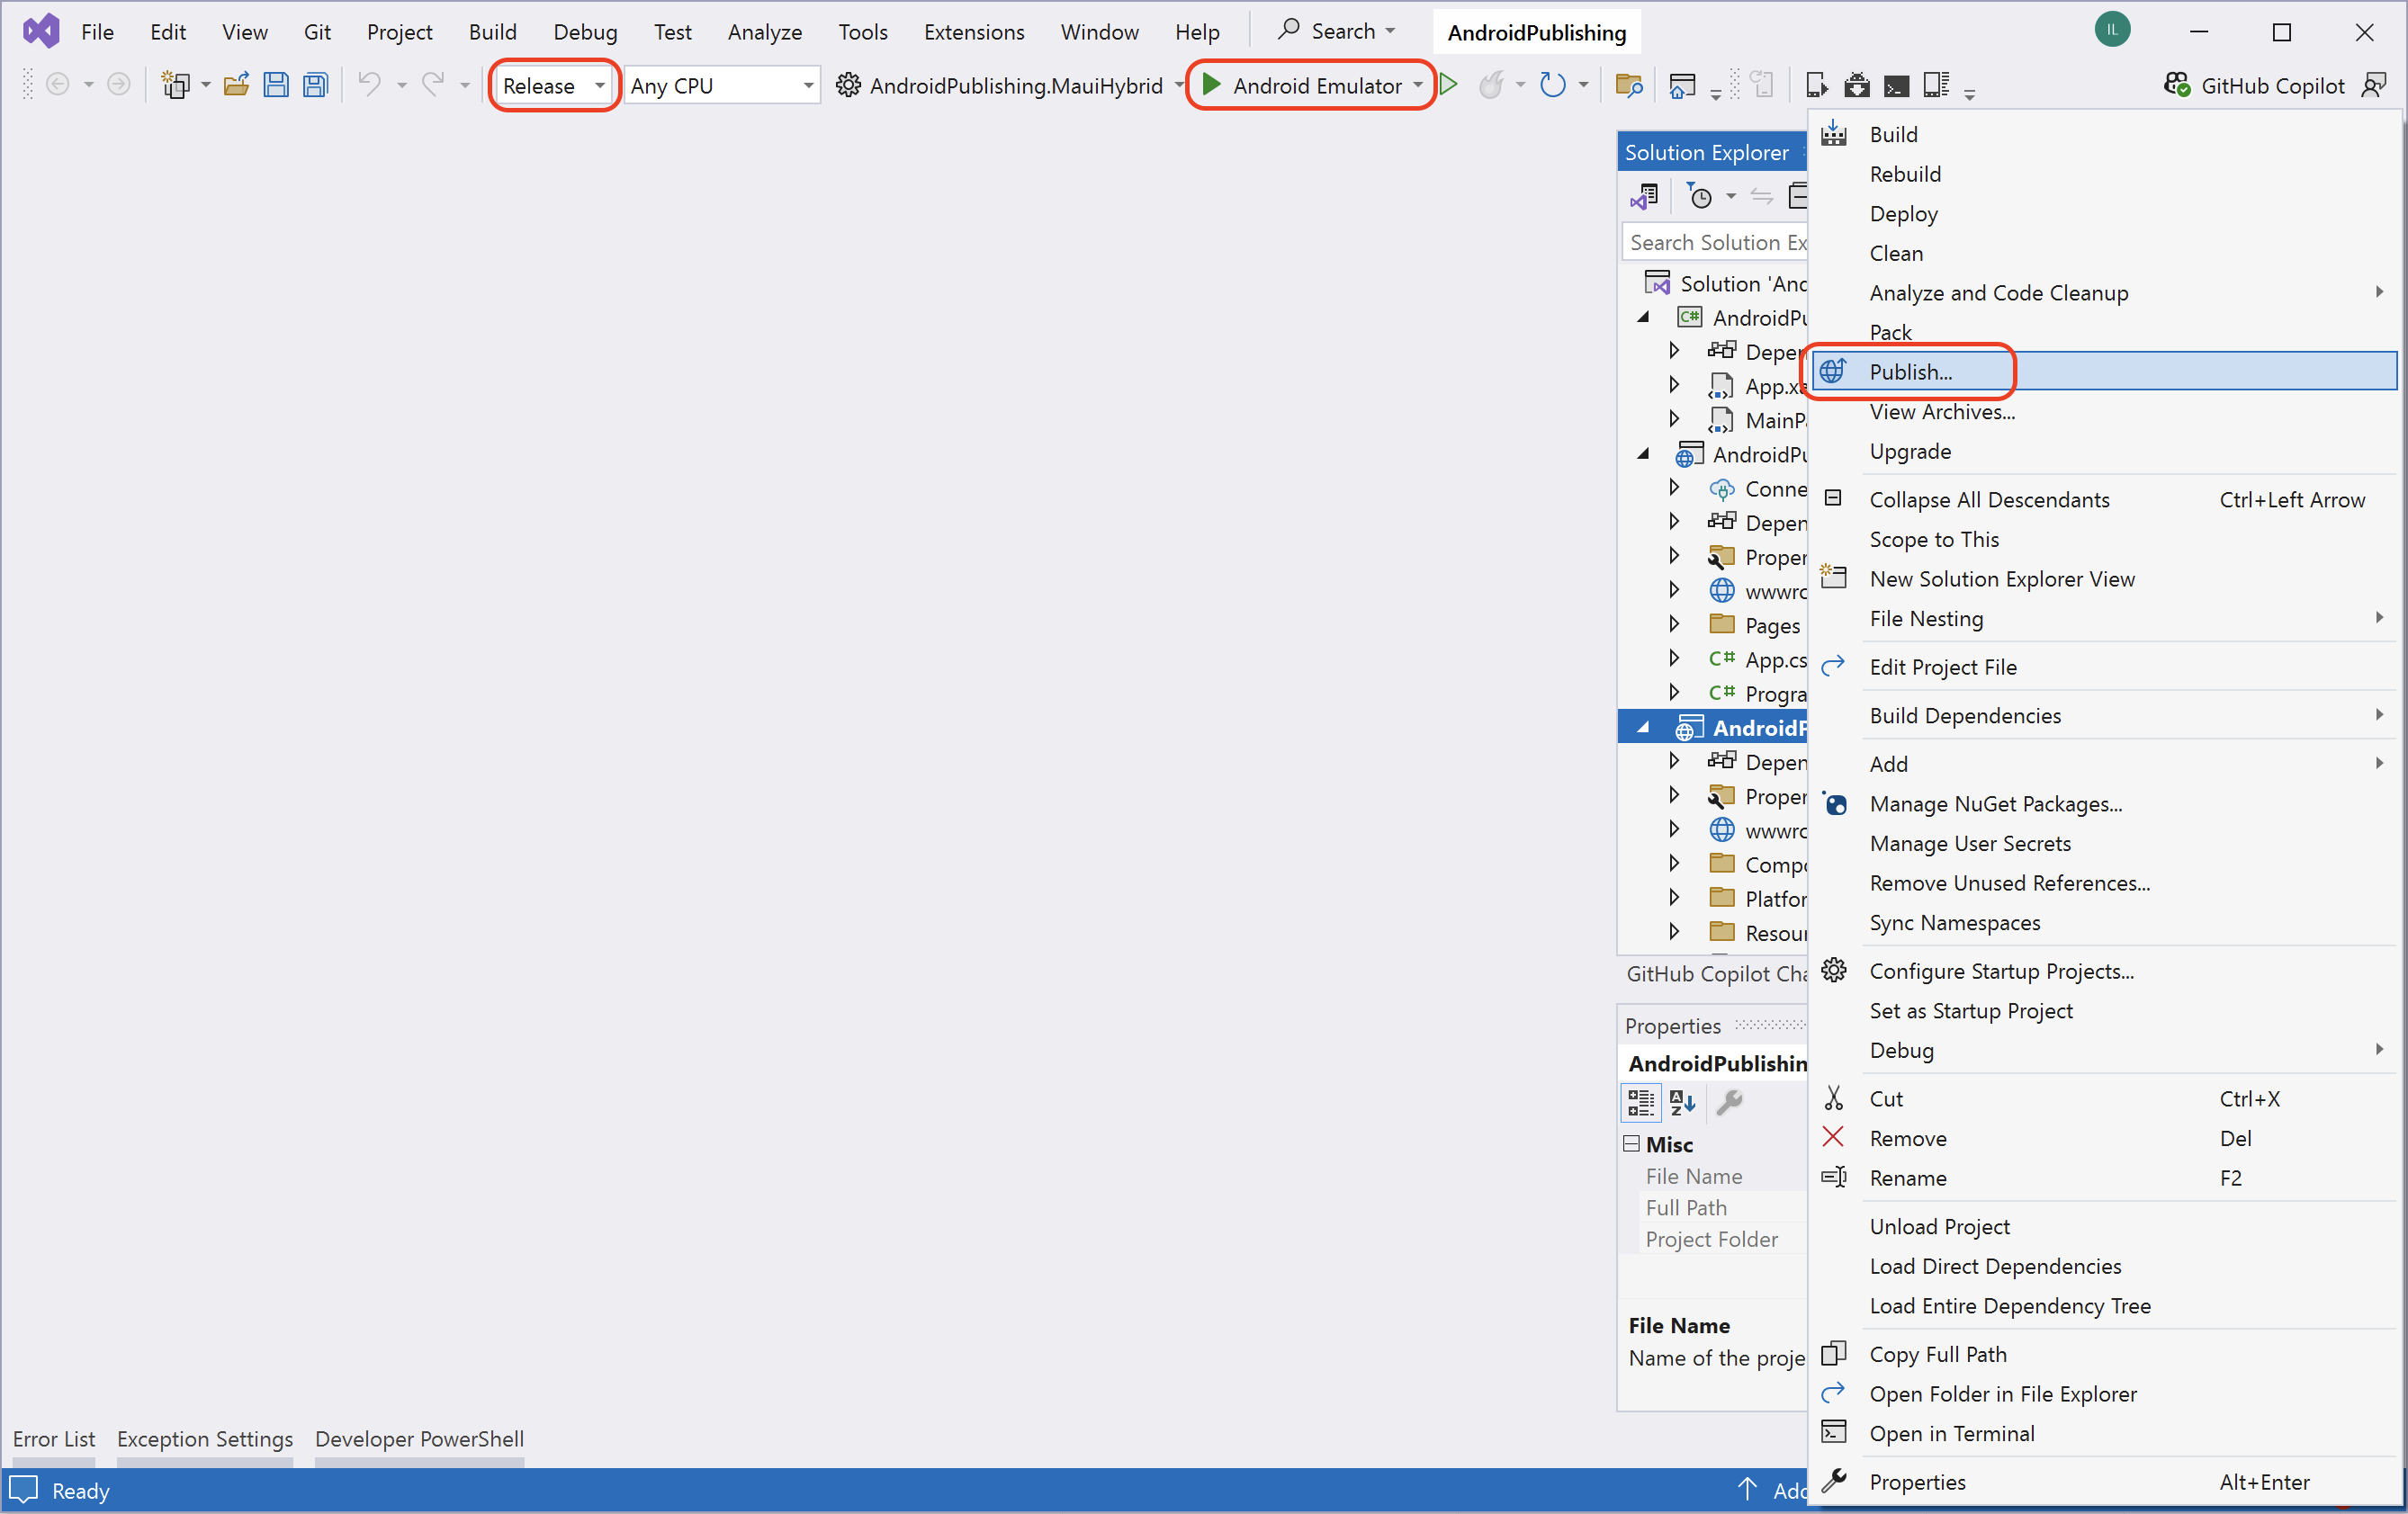
Step 2: Choose the Android Emulator target, set the configuration to Release, and invoke the publish command via the context menu:
- In Solution Explorer, right-click the
.MauiHybridproject. - Select
Publish. - The process may take several minutes. No worries—this is expected.
Step 3: Check the result:
- Once complete, Visual Studio will generate an
.aab(Android App Bundle) file in thebin\Release\net8.0-android\publishfolder (or similar path).
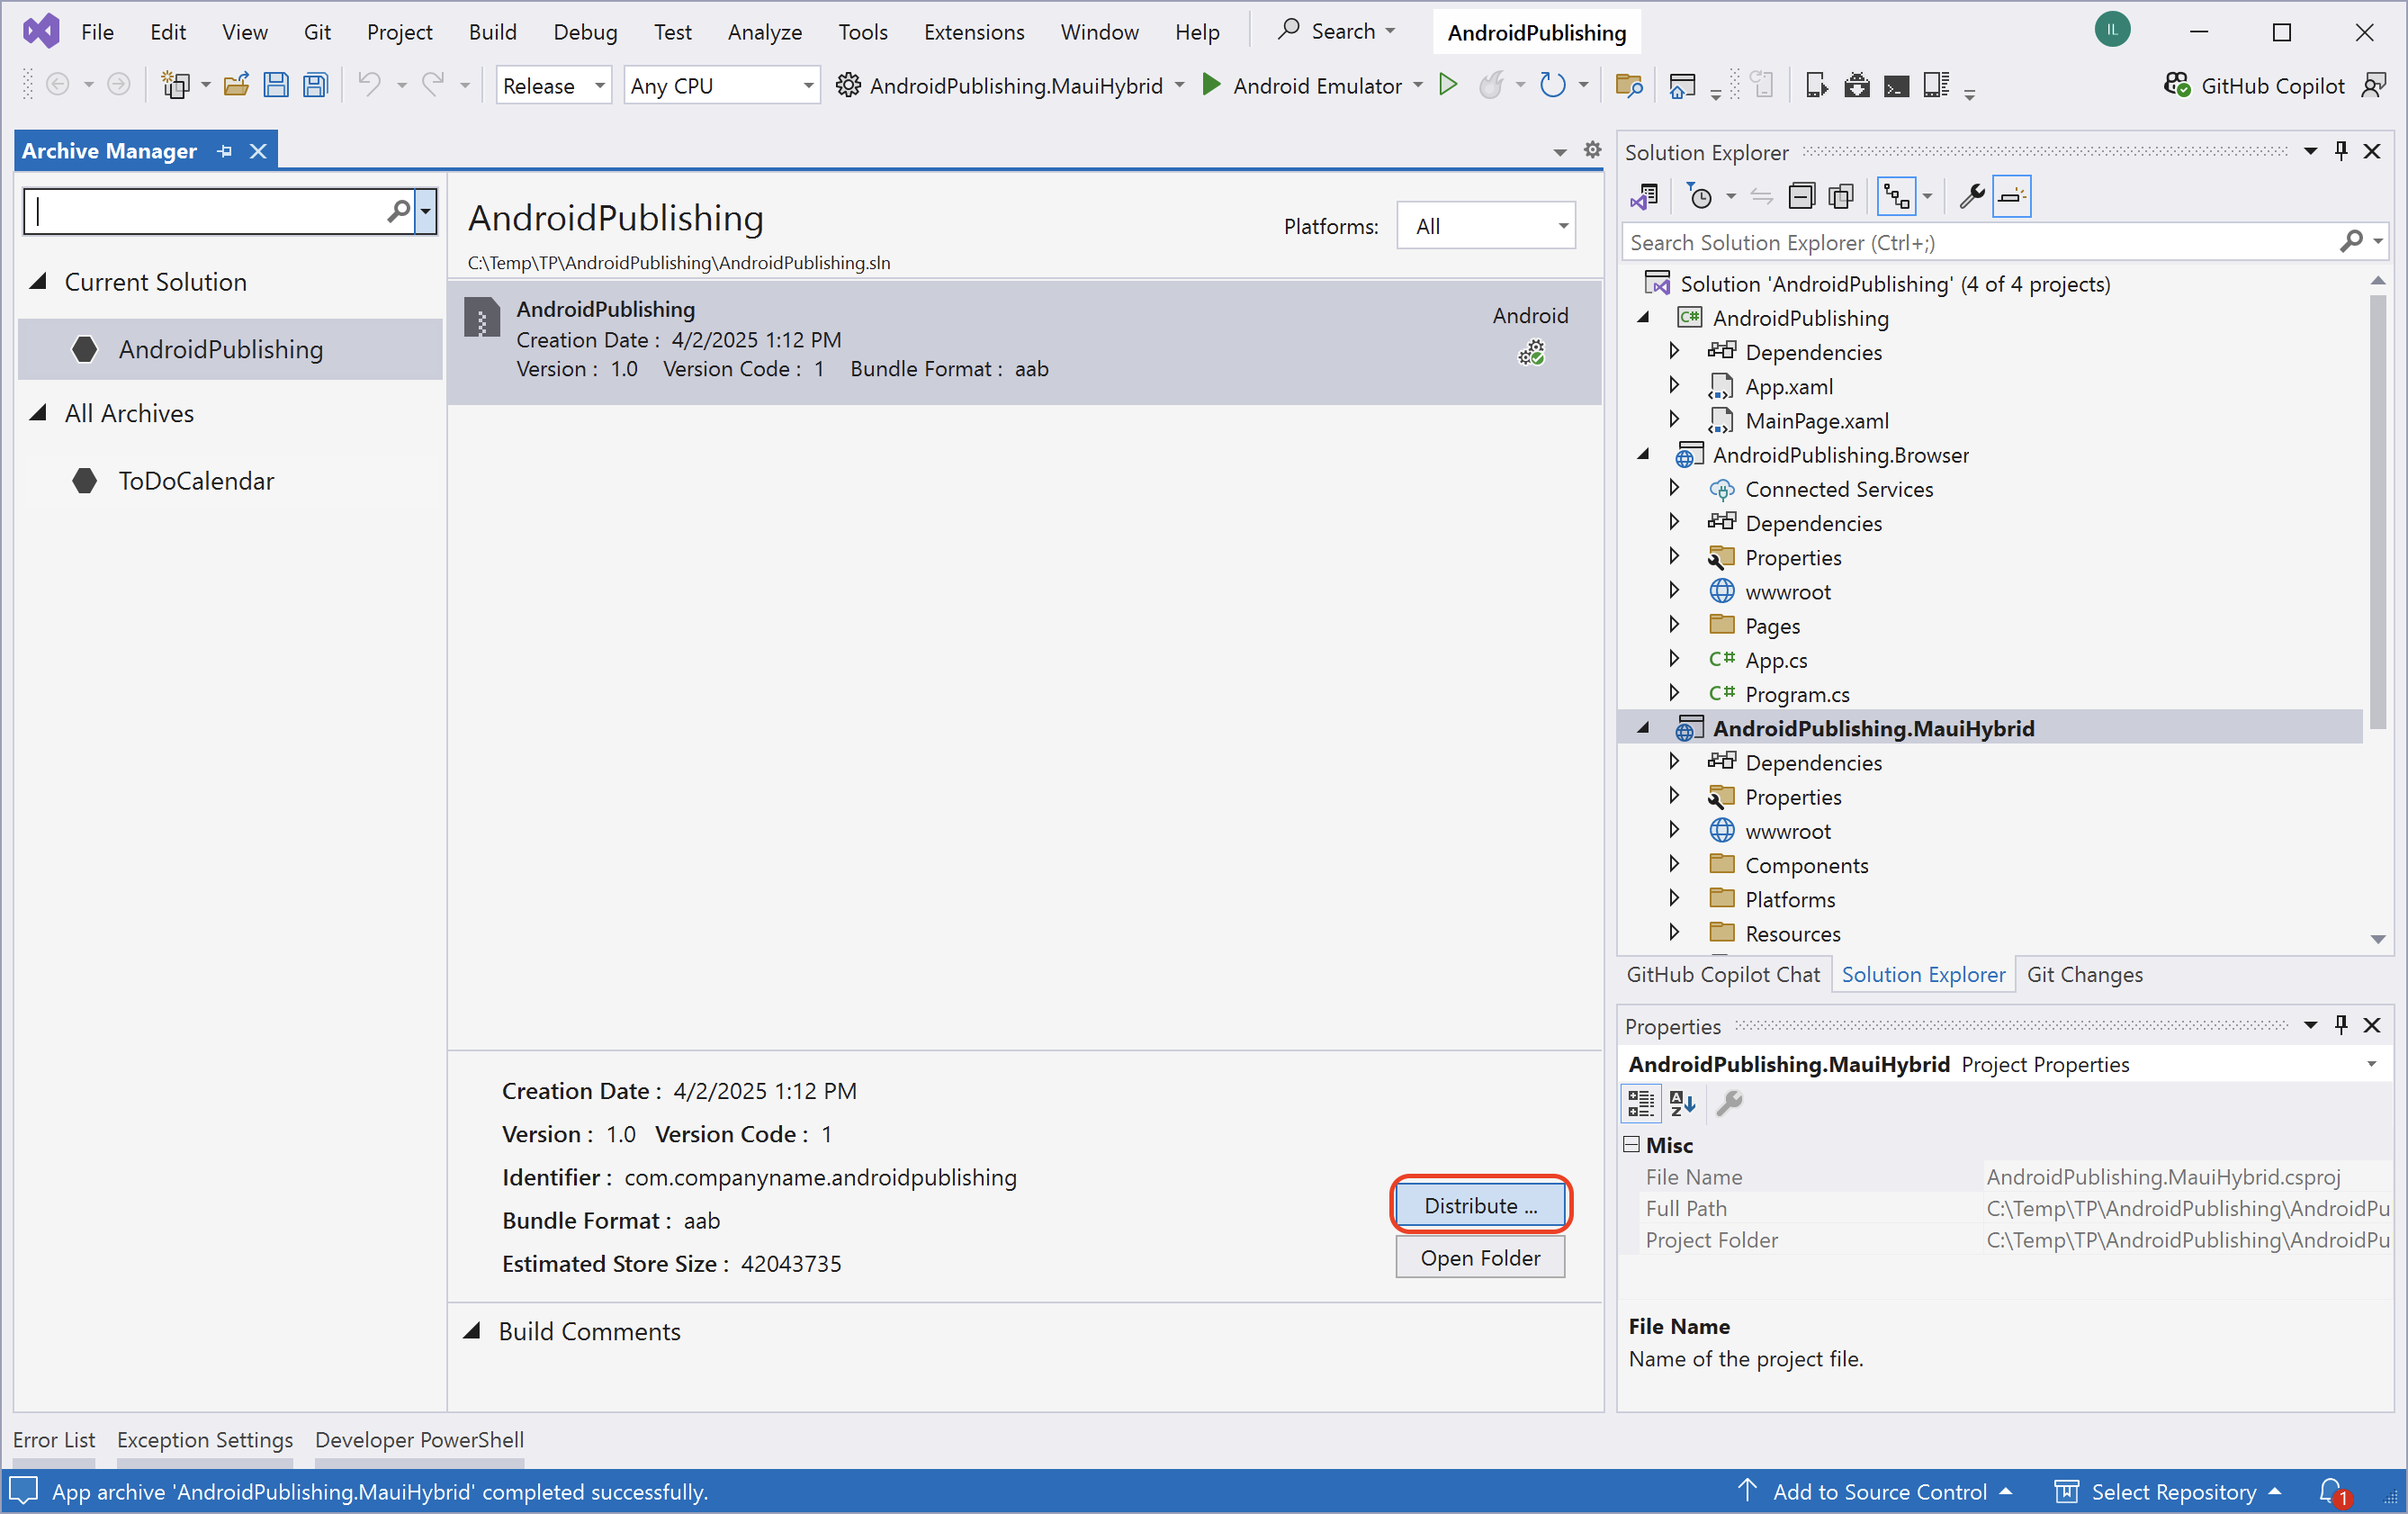
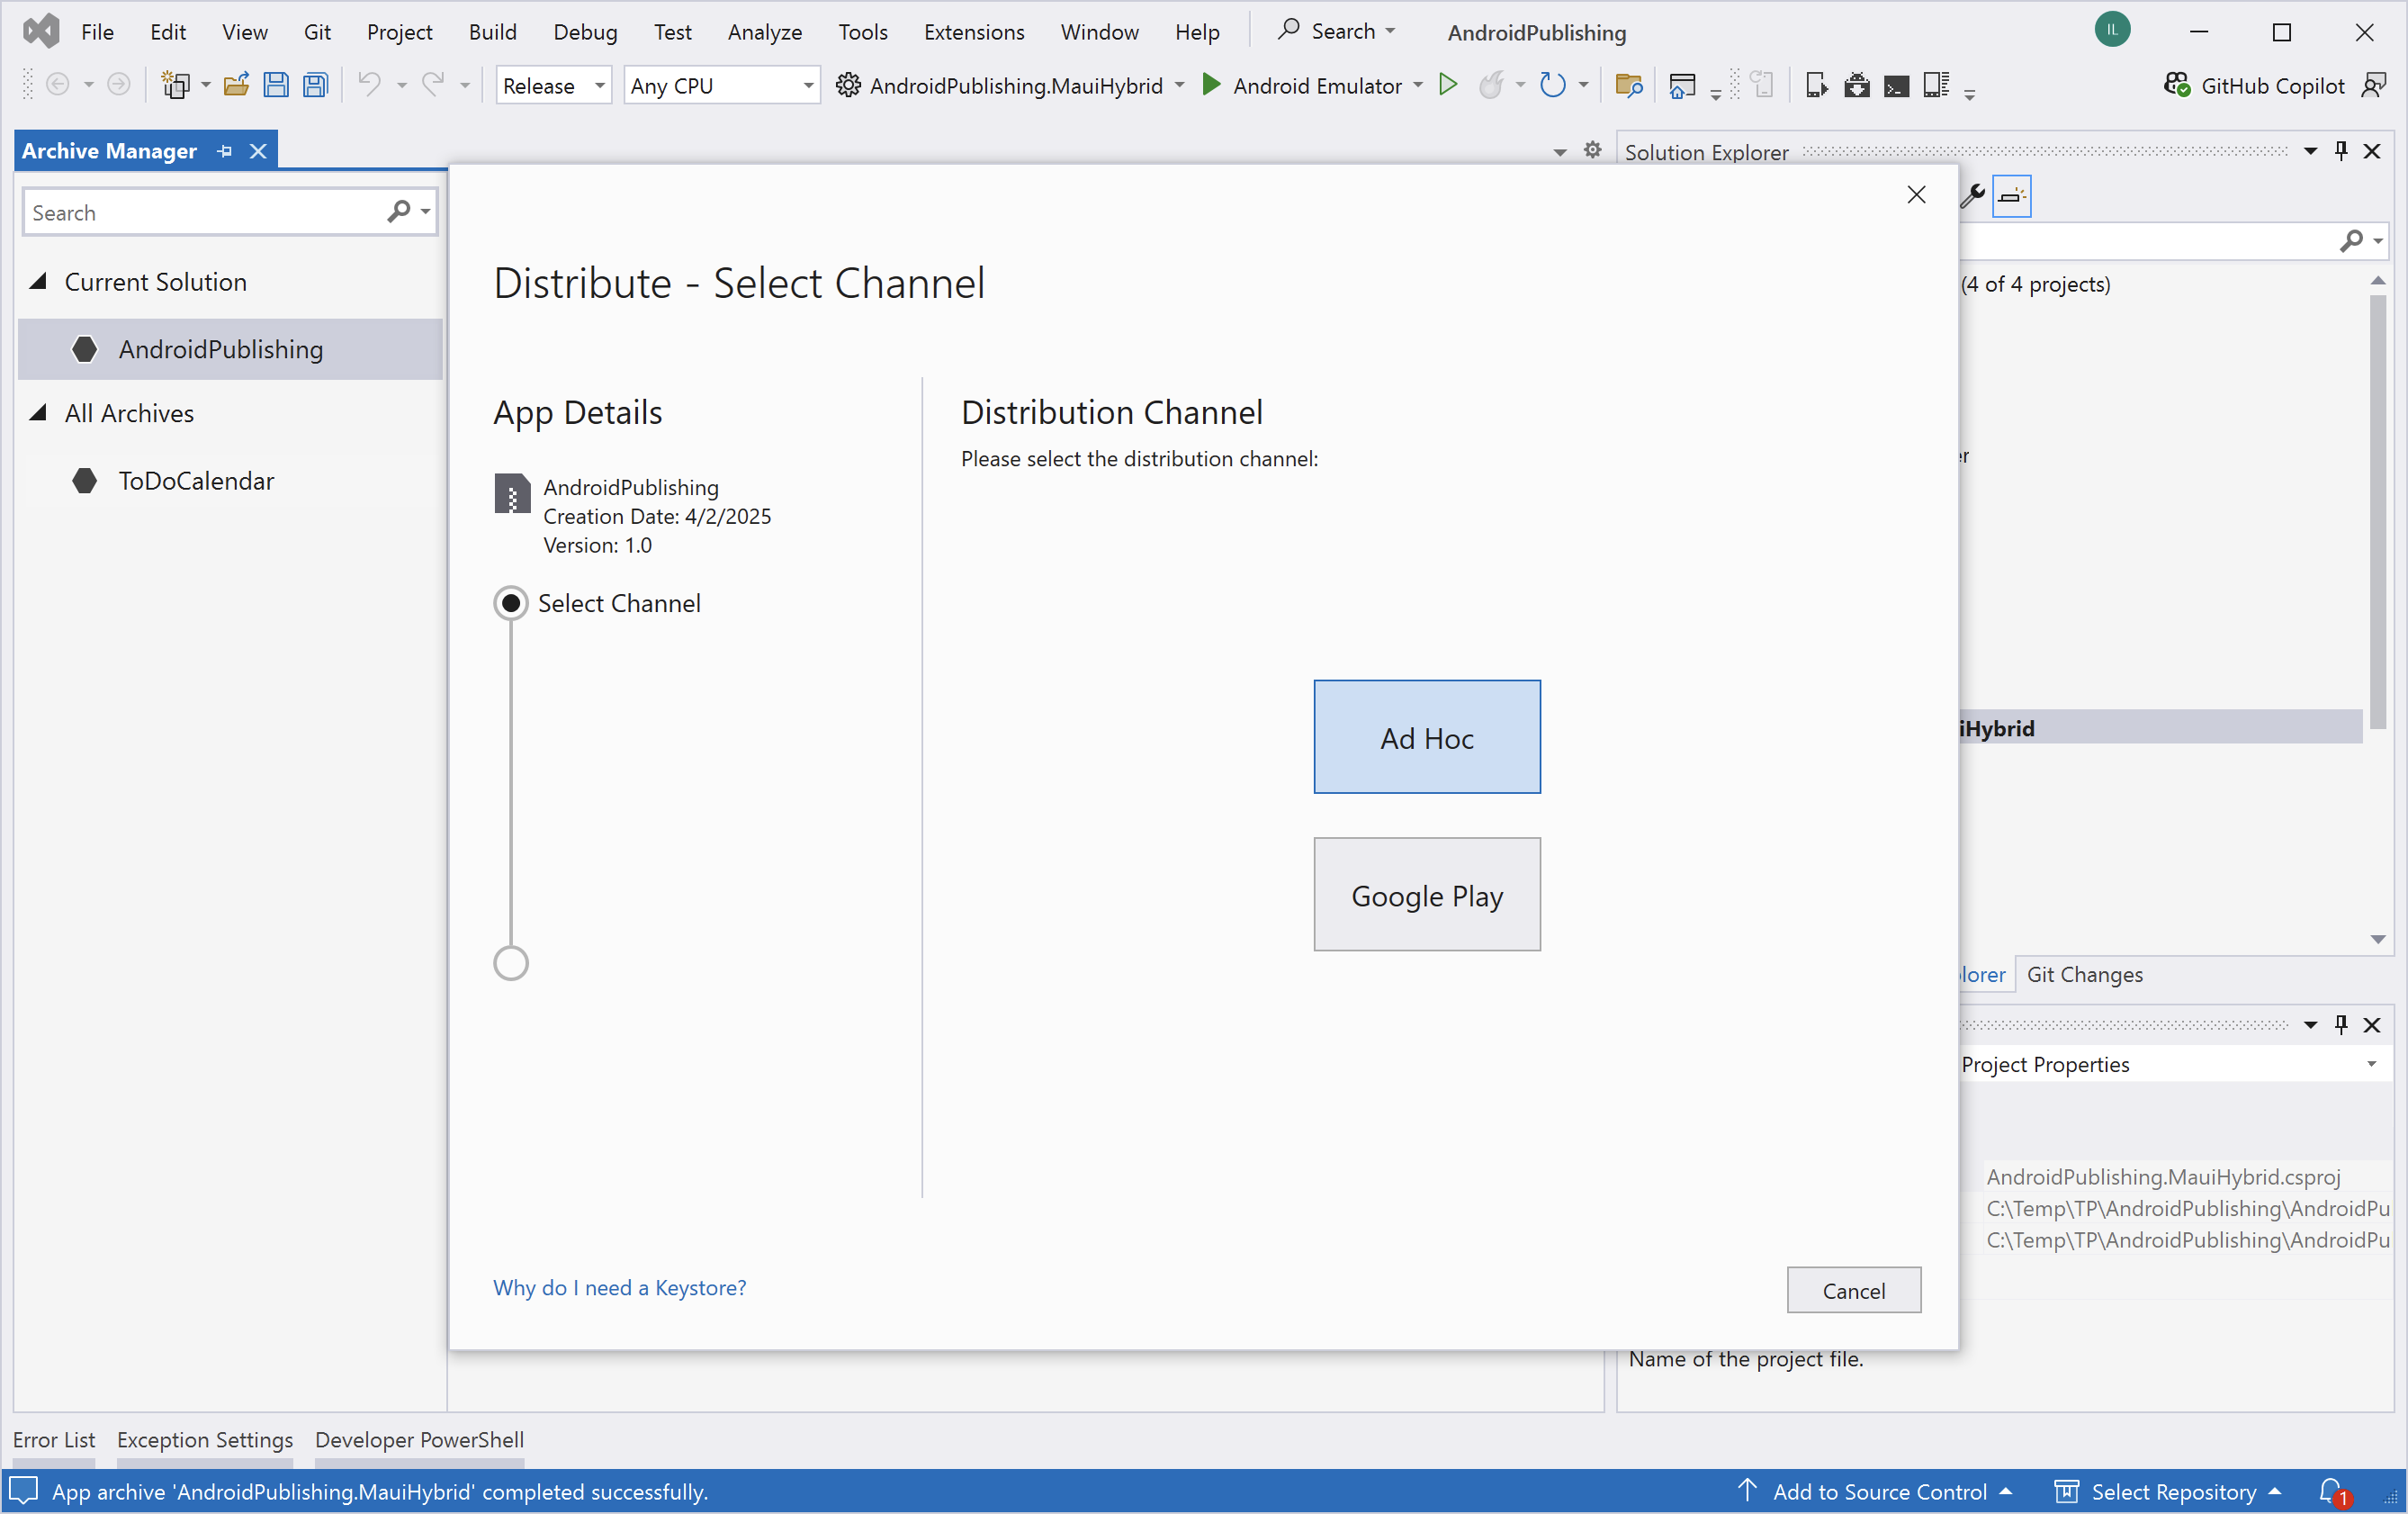
Step 4: Distribute manually the first time:
- Click the Distribute button and choose Ad Hoc.
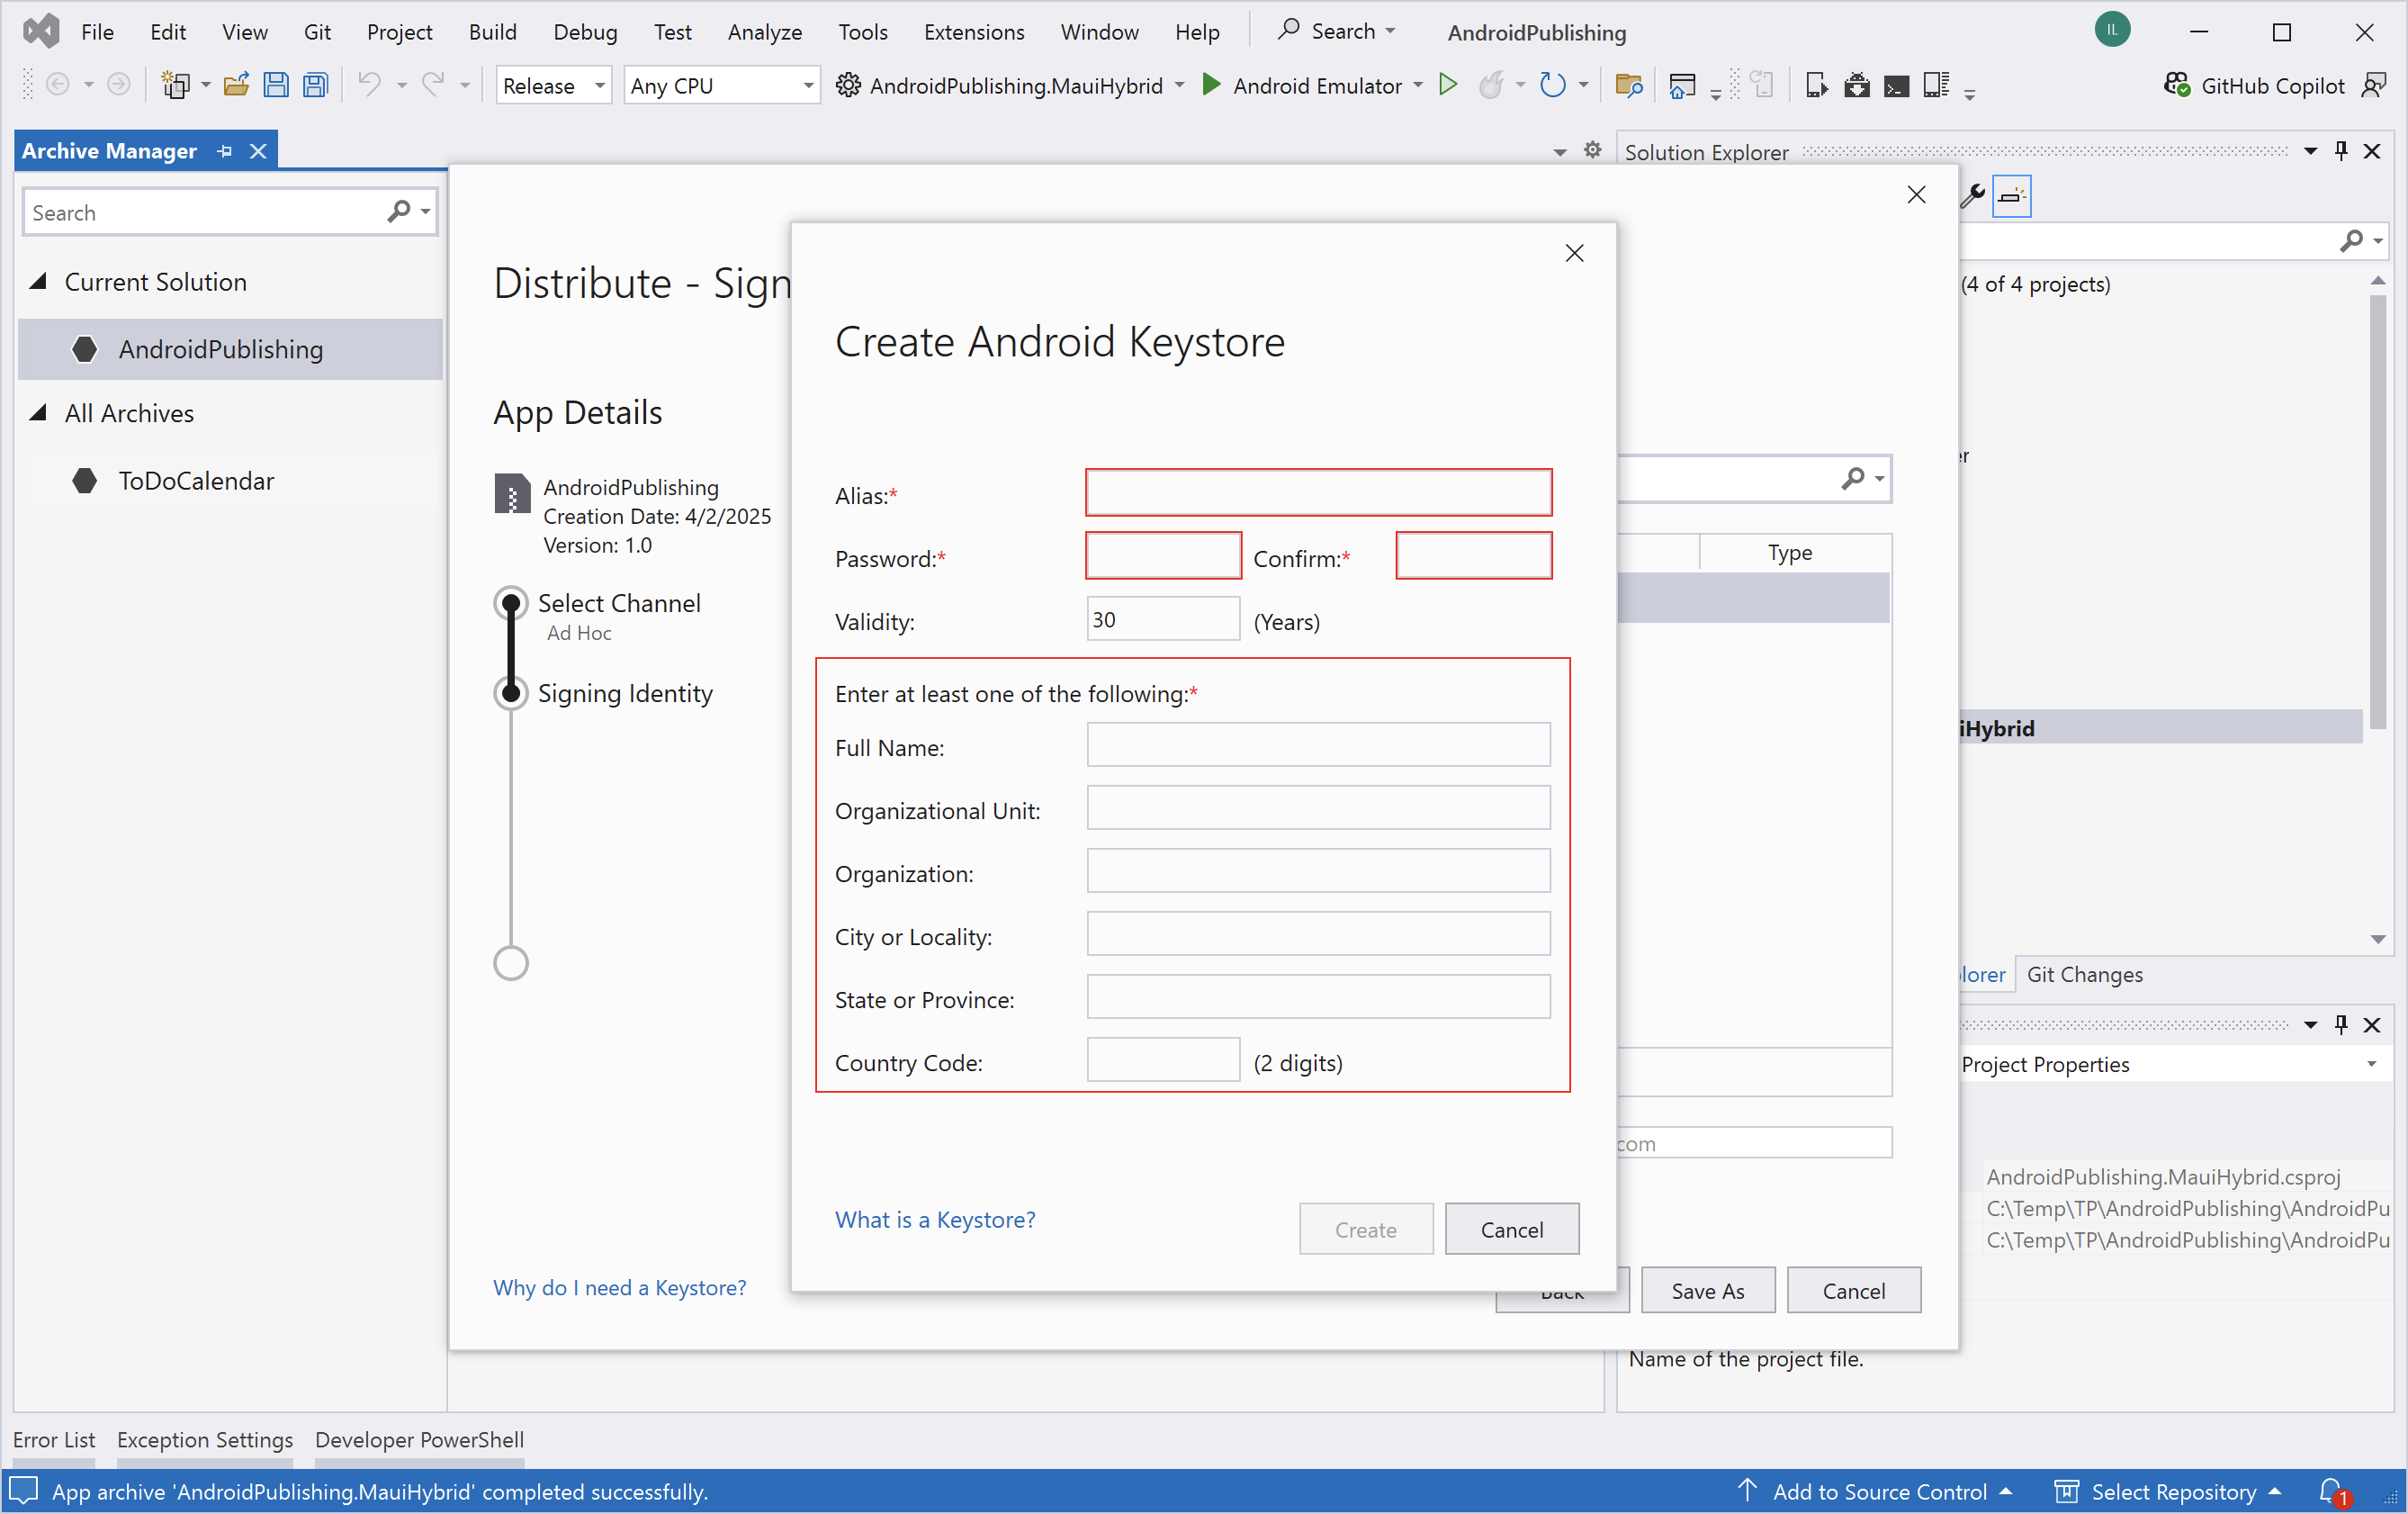
Step 5: Create a new Signing Identity:
- Click the
+button in the signing dialog. - Fill in the form with your keystore information (name, password, alias, etc.).
Step 6: Sign the bundle:
- After the signing identity is created, click Save As and wait while Visual Studio signs the
.aabfile.
Step 7: Upload to Google Play:
- The signed
.aabfile is now ready for upload via the Google Play Console.
💡 Reminder: Don't forget to back up your signing identity. Losing it may prevent you from updating your app in the future.
For more information, refer to the official Microsoft documentation: MAUI Android Deployment
iOS
We recommend using macOS to publish the iOS version of your OpenSilver app.
Step 1: Set up your Apple Developer Account
- Enroll in the Apple Developer Program.
- Follow Microsoft's official guide to generate your provisioning profile and distribution certificate.
Step 2: Build the IPA file
To simplify the build process, we provide a helper script.
This script builds your .MauiHybrid project and packages it as an .ipa file ready for submission.
#!/bin/bash
# MAUI iOS Build Script
# This script builds a MAUI Hybrid application for iOS and packages it as an IPA file
# Configuration variables - adapt to your project structure
APP_NAME="MY_APPLICATION"
PROJECT_NAME="$APP_NAME.MauiHybrid"
PROJECT_PATH="$(pwd)"
SOLUTION_FILE="$APP_NAME.sln"
CONFIGURATION="Release"
TARGET_FRAMEWORK="net8.0-ios"
PLATFORM="iPhone"
# Certificate and provisioning profile information
PROVISIONING_PROFILE_NAME="MY_PROVISIONING_PROFILE_NAME"
# The ceritifcate name should look like this: Apple Distribution: Company Name (Number)
CERTIFICATE_NAME="MY_CERTIFICATE_NAME"
# Output paths
BUILD_OUTPUT="$PROJECT_PATH/$PROJECT_NAME/bin/$CONFIGURATION/$PLATFORM"
IPA_OUTPUT="$PROJECT_PATH/$PROJECT_NAME/bin/ipa"
# Colors for terminal output
GREEN='\033[0;32m'
RED='\033[0;31m'
YELLOW='\033[1;33m'
NC='\033[0m' # No Color

echo -e "${YELLOW}Starting build process for $PROJECT_NAME...${NC}"

# Clean all bin and obj folders in the solution
echo -e "${YELLOW}Removing all bin and obj folders...${NC}"
find "$PROJECT_PATH" -type d -name "bin" -o -name "obj" | xargs rm -rf
echo -e "${GREEN}All bin and obj folders removed${NC}"

# Create output directory if it doesn't exist
mkdir -p "$IPA_OUTPUT"

# Clean the project
echo -e "${YELLOW}Cleaning previous build...${NC}"
dotnet clean "$PROJECT_PATH/$PROJECT_NAME/$PROJECT_NAME.csproj" --configuration "$CONFIGURATION" || { echo -e "${RED}Failed to clean project${NC}"; exit 1; }

# Restore NuGet packages
echo -e "${YELLOW}Restoring NuGet packages...${NC}"
dotnet restore "$PROJECT_PATH/$PROJECT_NAME/$PROJECT_NAME.csproj" || { echo -e "${RED}Failed to restore packages${NC}"; exit 1; }

# Build the project for iOS
echo -e "${YELLOW}Building project for iOS...${NC}"
dotnet build "$PROJECT_PATH/$PROJECT_NAME/$PROJECT_NAME.csproj" --configuration "$CONFIGURATION" -f:$TARGET_FRAMEWORK || { echo -e "${RED}Failed to build project${NC}"; exit 1; }

# Publish the iOS app
echo -e "${YELLOW}Publishing iOS app...${NC}"
dotnet publish "$PROJECT_PATH/$PROJECT_NAME/$PROJECT_NAME.csproj" \
  --configuration "$CONFIGURATION" \
  -f:$TARGET_FRAMEWORK \
  /p:ArchiveOnBuild=true \
  /p:CodesignKey="$CERTIFICATE_NAME" \
  /p:CodesignProvision="$PROVISIONING_PROFILE_NAME" \
  /p:RuntimeIdentifier=ios-arm64 \
  /p:BuildIpa=true \
  /p:IpaPackageDir="$IPA_OUTPUT" || { echo -e "${RED}Failed to publish and archive app${NC}"; exit 1; }

# Check if IPA was created
IPA_FILES=("$IPA_OUTPUT"/*.ipa)
IPA_COUNT=$(find "$IPA_OUTPUT" -name "*.ipa" -type f | wc -l)

if [ $IPA_COUNT -eq 0 ]; then
    echo -e "${RED}No IPA file was created. Please check the build logs for errors.${NC}"
    exit 1
elif [ $IPA_COUNT -eq 1 ]; then
    IPA_FILE="${IPA_FILES[0]}"
    IPA_FILENAME=$(basename "$IPA_FILE")
    echo -e "${GREEN}Successfully created IPA: $IPA_FILENAME${NC}"
    echo -e "${GREEN}Full path: $IPA_FILE${NC}"
else
    echo -e "${RED}Multiple IPA files found in the output directory:${NC}"
    for ipa in "${IPA_FILES[@]}"; do
        echo -e "${RED}  - $(basename "$ipa")${NC}"
    done
    echo -e "${RED}Expected only one IPA file. Please clean the output directory and rebuild.${NC}"
    exit 1
fi

echo -e "${GREEN}Build process completed!${NC}"
✅ Make sure to update the
APP_NAME,CERTIFICATE_NAME,PROVISIONING_PROFILE_NAME, andTARGET_FRAMEWORK(optional) in the script.
Step 3: Upload the IPA
Use our second helper script to upload the IPA file via Apple's altool.
This script validates and uploads your IPA file to App Store Connect using your Apple ID.
#!/bin/bash

# Upload IPA to App Store Connect Script
# This script uploads a MAUI Hybrid iOS app to App Store Connect using altool

# Colors for terminal output
GREEN='\033[0;32m'
RED='\033[0;31m'
YELLOW='\033[1;33m'
NC='\033[0m' # No Color

# Configuration
APP_NAME="MY_APPLICATION"
PROJECT_NAME="$APP_NAME.MauiHybrid"
IPA_DIR="$(pwd)/$PROJECT_NAME/bin/ipa"

# Find IPA file in directory
IPA_COUNT=$(find "$IPA_DIR" -name "*.ipa" -type f 2>/dev/null | wc -l)

if [ $IPA_COUNT -eq 0 ]; then
    echo -e "${RED}Error: No IPA file found in $IPA_DIR${NC}"
    echo -e "${YELLOW}Please build the IPA first using build-ios.sh${NC}"
    exit 1
elif [ $IPA_COUNT -gt 1 ]; then
    echo -e "${RED}Error: Multiple IPA files found in $IPA_DIR:${NC}"
    find "$IPA_DIR" -name "*.ipa" -type f -exec basename {} \; | while read -r ipa; do
        echo -e "${RED}  - $ipa${NC}"
    done
    echo -e "${YELLOW}Please ensure only one IPA file exists in the directory${NC}"
    exit 1
fi

# Get the IPA file path
IPA_PATH=$(find "$IPA_DIR" -name "*.ipa" -type f)
IPA_FILENAME=$(basename "$IPA_PATH")

# Display information
echo -e "${YELLOW}===============================================${NC}"
echo -e "${YELLOW}Upload IPA to App Store Connect${NC}"
echo -e "${YELLOW}===============================================${NC}"
echo -e "${GREEN}IPA file: $IPA_FILENAME${NC}"
echo -e "${GREEN}Full path: $IPA_PATH${NC}"
echo ""

# Prompt for Apple ID
read -p "Enter your Apple ID (email): " APPLE_ID
if [ -z "$APPLE_ID" ]; then
    echo -e "${RED}Error: Apple ID is required${NC}"
    exit 1
fi

# Validation step
echo -e "${YELLOW}Step 1: Validating IPA file...${NC}"
echo -e "${YELLOW}You will be prompted to enter your app-specific password.${NC}"
echo -e "${YELLOW}(Generate one at appleid.apple.com > Security > App-Specific Passwords)${NC}"
echo ""

xcrun altool --validate-app -f "$IPA_PATH" -t ios -u "$APPLE_ID"
VALIDATION_RESULT=$?

if [ $VALIDATION_RESULT -ne 0 ]; then
    echo -e "${RED}Validation failed. Do you want to continue with upload anyway? (y/n)${NC}"
    read CONTINUE
    if [ "$CONTINUE" != "y" ] && [ "$CONTINUE" != "Y" ]; then
        echo -e "${YELLOW}Upload canceled.${NC}"
        exit 1
    fi
fi

# Upload step
echo -e "${YELLOW}Step 2: Uploading IPA to App Store Connect...${NC}"
echo -e "${YELLOW}You will be prompted to enter your app-specific password again.${NC}"
echo ""

xcrun altool --upload-app -f "$IPA_PATH" -t ios -u "$APPLE_ID"
UPLOAD_RESULT=$?

if [ $UPLOAD_RESULT -eq 0 ]; then
    echo -e "${GREEN}Upload completed successfully!${NC}"
    echo -e "${YELLOW}Next steps:${NC}"
    echo -e "1. Go to App Store Connect (https://appstoreconnect.apple.com)"
    echo -e "2. Navigate to Your App > iOS App > TestFlight or App Store"
    echo -e "3. Complete any required information and submit for review"
else
    echo -e "${RED}Upload failed. Please check the error message above.${NC}"
    exit 1
fi
✅ Make sure to update the
APP_NAMEin the script.
🔐 You will need an app-specific password from your Apple ID for validation and upload.
Step 4: Finalize in App Store Connect
Once the upload is successful:
- Visit App Store Connect.
- Go to Apps, select your app.
- Fill out any required information and submit your app for review.
💡 Reminder: Always test your app on a physical device before uploading to the App Store.
For full guidance, refer to the official docs: MAUI iOS Deployment
macOS
We recommend using macOS to publish the macOS version of your OpenSilver app.
Step 1: Set up your Apple Developer Account
- Enroll in the Apple Developer Program.
- Follow Microsoft's guide for macOS to generate your provisioning profile, distribution certificate, and Installer Certificate. You can reuse your iOS distribution certificate and provisioning profile, but the Installer Certificate is still required for macOS apps.
Step 2: Build the macOS app
Use the build-mac.sh script to build and package your .MauiHybrid project for macOS:
#!/bin/bash
# MAUI macOS Build Script
# This script builds a MAUI Hybrid application for macOS and packages it for the Mac App Store
# Configuration variables - adapt to your project structure
APP_NAME="MY_APPLICATION"
PROJECT_NAME="$APP_NAME.MauiHybrid"
PROJECT_PATH="$(pwd)"
SOLUTION_FILE="$APP_NAME.sln"
CONFIGURATION="Release"
TARGET_FRAMEWORK="net8.0-maccatalyst"

# Certificates and provisioning profile information
PROVISIONING_PROFILE_NAME="MY_PROVISIONING_PROFILE_NAME"
CERTIFICATE_NAME="MY_CERTIFICATE_NAME"
INSTALLER_CERTIFICATE_NAME="MY_INSTALLER_CERTIFICATE_NAME"

# Output paths
PKG_OUTPUT="$PROJECT_PATH/$PROJECT_NAME/bin/pkg"

# Colors for terminal output
GREEN='\033[0;32m'
RED='\033[0;31m'
YELLOW='\033[1;33m'
NC='\033[0m' # No Color

echo -e "${YELLOW}Starting build process for $PROJECT_NAME (macOS)...${NC}"

# Step 0: Clean all bin and obj folders in the solution
echo -e "${YELLOW}Removing all bin and obj folders...${NC}"
find "$PROJECT_PATH" -type d -name "bin" -o -name "obj" | xargs rm -rf
echo -e "${GREEN}All bin and obj folders removed${NC}"

# Create output directory if it doesn't exist
mkdir -p "$PKG_OUTPUT"

# Build MacCatalyst version
echo -e "${YELLOW}Building for MacCatalyst...${NC}"
dotnet build "$PROJECT_PATH/$PROJECT_NAME/$PROJECT_NAME.csproj" -c:$CONFIGURATION -f:$TARGET_FRAMEWORK

# Publish for Mac App Store
echo -e "${YELLOW}Publishing for Mac App Store...${NC}"
dotnet publish "$PROJECT_PATH/$PROJECT_NAME/$PROJECT_NAME.csproj" \
  -f:$TARGET_FRAMEWORK \
  -c:$CONFIGURATION \
  -p:ApplicationTitle=$APP_NAME \
  -p:MtouchLink=SdkOnly \
  -p:CreatePackage=true \
  -p:EnableCodeSigning=true \
  -p:EnablePackageSigning=true \
  -p:CodesignKey="$CERTIFICATE_NAME" \
  -p:CodesignProvision="$PROVISIONING_PROFILE_NAME" \
  -p:CodesignEntitlements="$PROJECT_PATH/$PROJECT_NAME/Platforms/MacCatalyst/Entitlements.plist" \
  -p:PackageSigningKey="$INSTALLER_CERTIFICATE_NAME" \
  -p:PkgPackagePath="$PKG_OUTPUT/$PROJECT_NAME.pkg"

# Find the app bundle
APP_DIR="$PROJECT_PATH/$PROJECT_NAME/bin/$CONFIGURATION/$TARGET_FRAMEWORK"
APP_BUNDLE="$APP_DIR/$APP_NAME.app"
PKG_FILE="$PKG_OUTPUT/$PROJECT_NAME.pkg"

# Check if the app bundle exists
if [ -d "$APP_BUNDLE" ]; then
    echo -e "${GREEN}Successfully built the app bundle: $APP_BUNDLE${NC}"
else
    echo -e "${RED}Failed to find the app bundle at: $APP_BUNDLE${NC}"
    echo -e "${YELLOW}Searching for app bundle elsewhere...${NC}"
    find "$PROJECT_PATH/$PROJECT_NAME/bin" -name "*.app" -type d
    exit 1
fi

# Check if the PKG was created in the specified output directory
if [ -f "$PKG_FILE" ]; then
    echo -e "${GREEN}Successfully created PKG at: $PKG_FILE${NC}"
    echo -e "${GREEN}Your app is ready for submission to the Mac App Store!${NC}"
else
    echo -e "${RED}Failed to find PKG file at: $PKG_FILE${NC}"
    echo -e "${YELLOW}Searching for PKG file elsewhere...${NC}"
    find "$PROJECT_PATH/$PROJECT_NAME/bin" -name "*.pkg" -type f
    exit 1
fi

echo -e "${GREEN}Build process completed!${NC}"
✅ Make sure to update the
APP_NAME,CERTIFICATE_NAME,INSTALLER_CERTIFICATE_NAME,PROVISIONING_PROFILE_NAME, andTARGET_FRAMEWORK(optional) in the script.
Step 3: Upload the package
Use the upload-mac.sh script to upload the built app to App Store Connect:
#!/bin/bash
# Upload macOS app to App Store Connect Script
# This script uploads a MAUI Hybrid macOS app to App Store Connect using notarytool and altool

# Colors for terminal output
GREEN='\033[0;32m'
RED='\033[0;31m'
YELLOW='\033[1;33m'
NC='\033[0m' # No Color

# Configuration
APP_NAME="MY_APPLICATION"
PROJECT_NAME="$APP_NAME.MauiHybrid"
PKG_PATH="$(pwd)/$PROJECT_NAME/bin/pkg/$PROJECT_NAME.pkg"

# Check if PKG file exists
if [ ! -f "$PKG_PATH" ]; then
    echo -e "${RED}Error: PKG file not found at $PKG_PATH${NC}"
    echo -e "${YELLOW}Please build the macOS app first using build-mac.sh${NC}"
    exit 1
fi

# Display information
echo -e "${YELLOW}===============================================${NC}"
echo -e "${YELLOW}Upload macOS App to App Store Connect${NC}"
echo -e "${YELLOW}===============================================${NC}"
echo -e "${GREEN}PKG file: $PKG_PATH${NC}"
echo ""

# Prompt for Apple ID
read -p "Enter your Apple ID (email): " APPLE_ID
if [ -z "$APPLE_ID" ]; then
    echo -e "${RED}Error: Apple ID is required${NC}"
    exit 1
fi

# Validation step
echo -e "${YELLOW}Step 1: Validating macOS app package...${NC}"
echo -e "${YELLOW}You will be prompted to enter your app-specific password.${NC}"
echo -e "${YELLOW}(Generate one at appleid.apple.com > Security > App-Specific Passwords)${NC}"
echo ""

xcrun altool --validate-app -f "$PKG_PATH" -t macos -u "$APPLE_ID"
VALIDATION_RESULT=$?

if [ $VALIDATION_RESULT -ne 0 ]; then
    echo -e "${RED}Validation failed. Do you want to continue with upload anyway? (y/n)${NC}"
    read CONTINUE
    if [ "$CONTINUE" != "y" ] && [ "$CONTINUE" != "Y" ]; then
        echo -e "${YELLOW}Upload canceled.${NC}"
        exit 1
    fi
fi

# Upload step
echo -e "${YELLOW}Step 2: Uploading macOS app to App Store Connect...${NC}"
echo -e "${YELLOW}You will be prompted to enter your app-specific password again.${NC}"
echo ""

xcrun altool --upload-app -f "$PKG_PATH" -t macos -u "$APPLE_ID"
UPLOAD_RESULT=$?

if [ $UPLOAD_RESULT -eq 0 ]; then
    echo -e "${GREEN}Upload completed successfully!${NC}"
    echo -e "${YELLOW}Next steps:${NC}"
    echo -e "1. Go to App Store Connect (https://appstoreconnect.apple.com)"
    echo -e "2. Navigate to Your App > macOS App > TestFlight or App Store"
    echo -e "3. Complete any required information and submit for review"
else
    echo -e "${RED}Upload failed. Please check the error message above.${NC}"
    exit 1
fi
✅ Make sure to update the
APP_NAMEin the script.
🔐 You will need an app-specific password from your Apple ID for validation and upload.
Step 4: Finalize in App Store Connect
Once the upload is successful:
- Visit App Store Connect.
- Go to Apps, select your app.
- Fill out any required information and submit your app for review.
💡 Reminder: Always test your macOS app locally before uploading it to the App Store.
For full guidance, refer to the official docs: MAUI macOS Deployment
Windows
To publish your OpenSilver MAUI Hybrid app to the Microsoft Store:
Step 1: Create the app in Partner Center
- Navigate to the Microsoft Partner Center Apps dashboard.
- Create a new app submission.
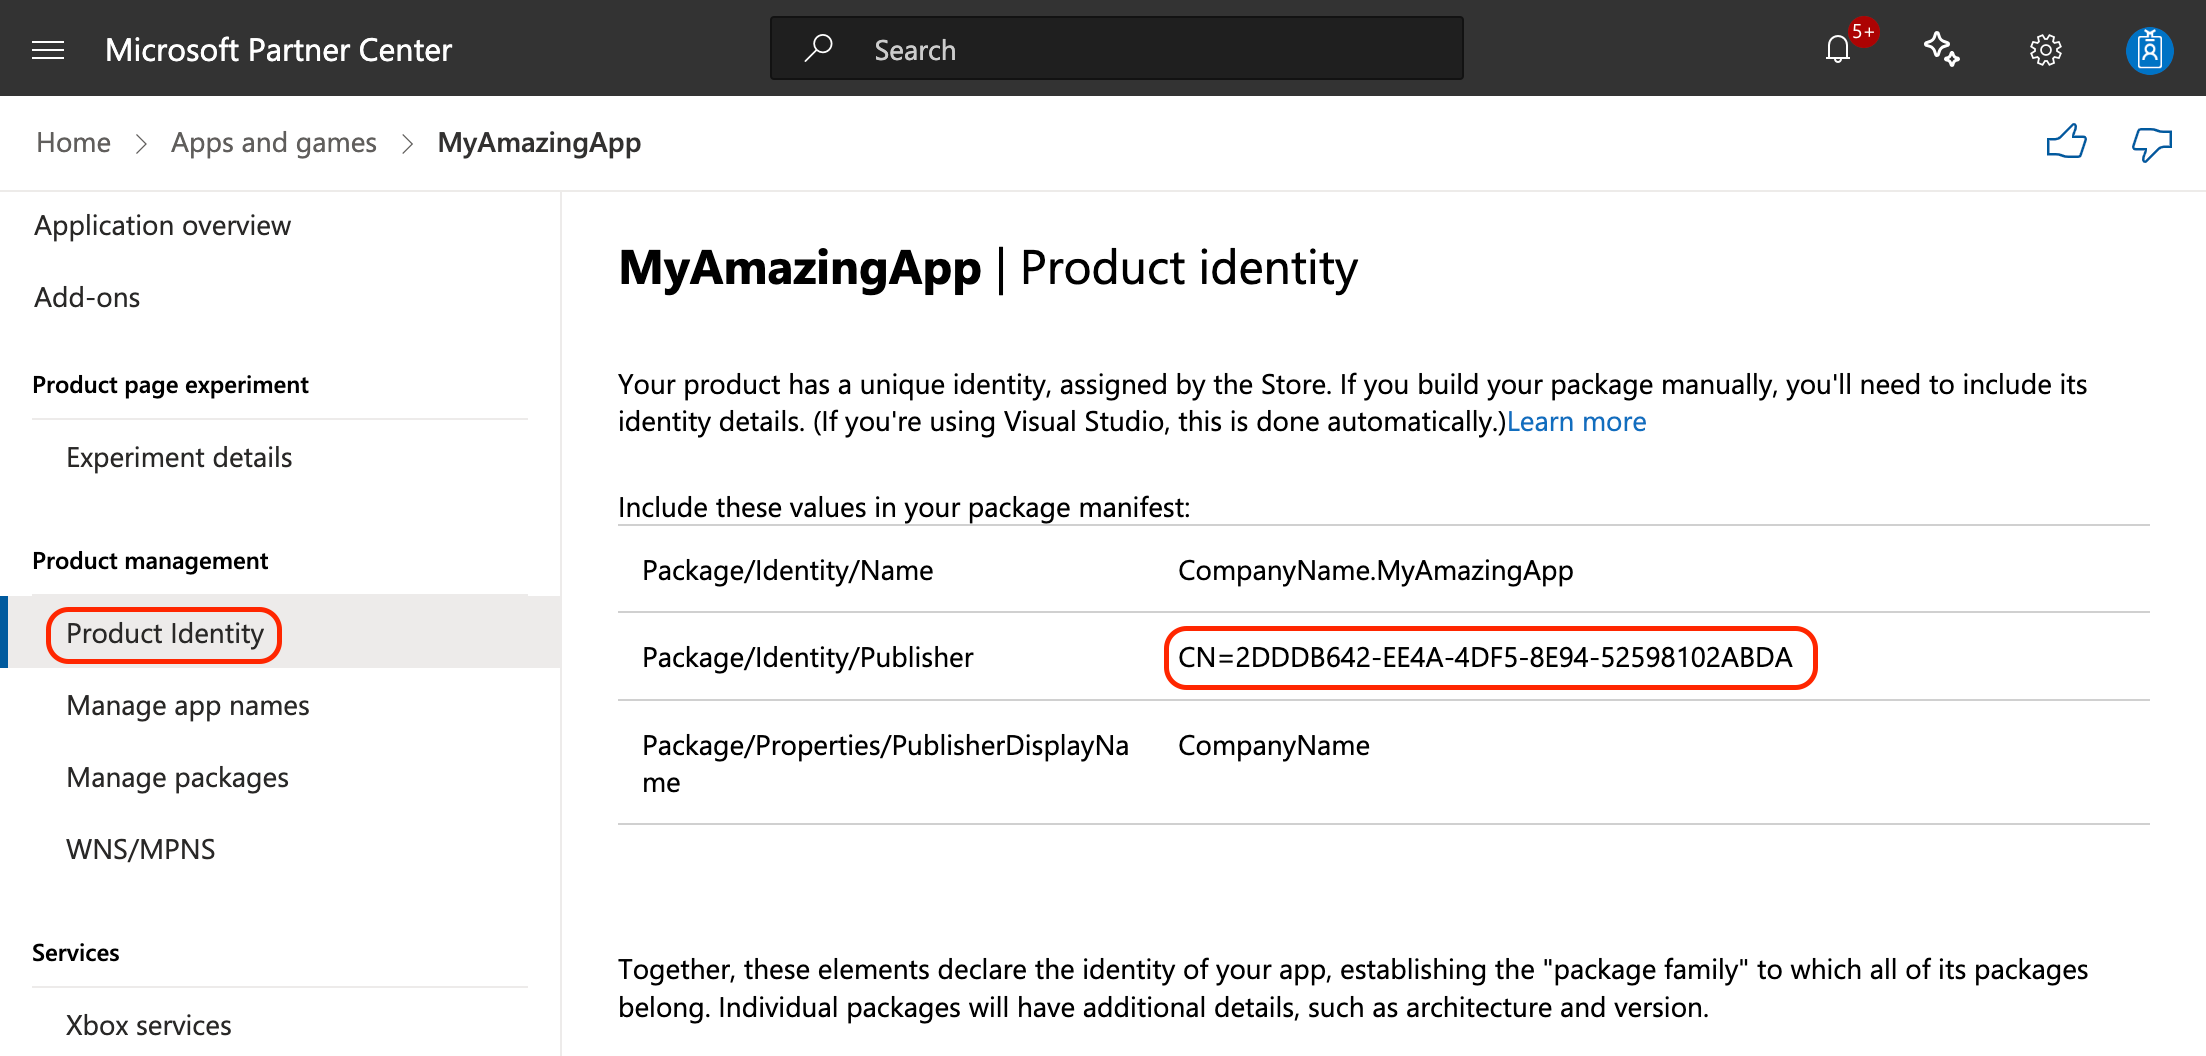
- Go to Product Identity and copy the
Package/Identity/Publishervalue. You’ll need it in the next step.
Step 2: Create a self-signed certificate
In PowerShell, run the following command, replacing <PublisherName> with the exact value copied from the previous step:
New-SelfSignedCertificate -Type Custom -Subject "CN=<PublisherName>" -KeyUsage DigitalSignature -FriendlyName "My temp dev cert" -CertStoreLocation "Cert:\CurrentUser\My" -TextExtension @("2.5.29.37={text}1.3.6.1.5.5.7.3.3", "2.5.29.19={text}")
Take note of the generated Thumbprint—you’ll need it for the publish command.
Step 3: Publish the app
We recommend using the command line to publish. Run the following command in Command Prompt, replacing placeholders with your actual values:
dotnet publish "YOUR_APP_NAME.MauiHybrid\YOUR_APP_NAME.MauiHybrid.csproj" -f <DOTNET_VERSION>-windows10.0.19041.0 -c Release -p:RuntimeIdentifierOverride=win10-x64 -p:WindowsPackageType=MSIX -p:AppxPackageSigningEnabled=true -p:PackageCertificateThumbprint=<THUMBPRINT_FROM_PREVIOUS_STEP>
This will generate a .msix file in the output folder.
Step 4: Upload to Partner Center
- Upload the
.msixfile to your app submission in Partner Center. - Complete all required fields and submit your app for review.
For detailed instructions, see the official docs: MAUI Windows Deployment Overview
Known Issues
Path Length Limitations
- There is a known issue related to the internal path size limitations in MAUI. This can result in build failures due to the generated temporary file paths exceeding 256 characters.
Workaround: Place your project folder as close to the root directory as possible (for example,C:\MyProject) to reduce the overall path length.
Windows Launch Failure (Code 3221226356 / 0xc0000374)
- Sometimes, when attempting to run the application on Windows, it may fail with exit code 3221226356 (0xc0000374).
More details: Official issue on GitHub.
Workaround: Try running the application again.
Missing Target in Assets File
- You may encounter the following error:
Solution: RunAssets file 'YourProject\YourProject.MauiHybrid\obj\project.assets.json' doesn't have a target for 'TARGET_NAME'. Ensure that restore has run and that you have included 'TARGET_NAME' in the TargetFrameworks for your project.dotnet restoreto regenerate the assets file.
App Resources Not Found
- If you encounter issues with missing resources (like images) in your app, ensure that the paths of resources do not contain any special characters or whitespaces. In general, due to Android resource naming rules, the filenames must start and end with a letter character, and can contain only numbers or underscores (_).
Cookies Are Not Being Sent
- Android WebView does not send cookies by default. To enable cookies, you need to adjust the CookieManager. For example, in your custom WebView handler:
    public class AndroidWebViewHandler : BlazorWebViewHandler
    {
        protected override void ConnectHandler(global::Android.Webkit.WebView webView)
        {
            CookieManager.Instance?.SetAcceptThirdPartyCookies(webView, true);

            base.ConnectHandler(webView);
        }
    }
General Troubleshooting Tips
- If you encounter strange or inconsistent behavior:
- Try manually deleting all
binandobjfolders in your solution. - Rebuild the solution several times.
- If the issue persists, switch the .NET version being used (e.g., switching from .NET 9 to .NET 8 has resolved issues in some cases).
- Try manually deleting all
Conclusion
The MAUI Hybrid Launcher extends OpenSilver applications into semi-native experiences across multiple platforms. Whether you’re building for Windows, macOS, Android, or iOS, you now have a streamlined way to leverage both OpenSilver’s rich UI capabilities and MAUI’s native functionalities.