Automated Tests on OpenSilver with Selenium
OpenSilver is not only an evolution of Silverlight, but also a gateway to exciting new features that improve the development cycle, like executing automated UI tests the same way that we can do against any other kind of front-end framework. In this guide, we will walk you through the first steps required to set up and execute a selenium test project.
1. The OpenSilver Solution
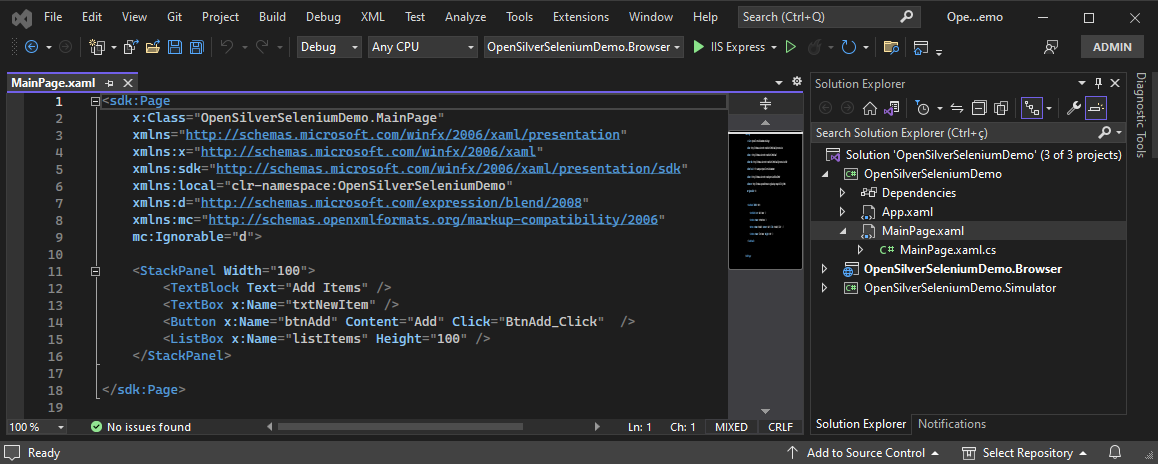
First, create an OpenSilver Solution, you can follow the steps here, but I will name the project OpenSilverSeleniumDemo, and let's replace the MainPage.xaml file contents with this:
<StackPanel Width="100">
    <TextBlock Text="Add Items" />
    <TextBox x:Name="txtNewItem" />
    <Button x:Name="btnAdd" Content="Add" Click="BtnAdd_Click"  />
    <ListBox x:Name="listItems" Height="100" />
</StackPanel>

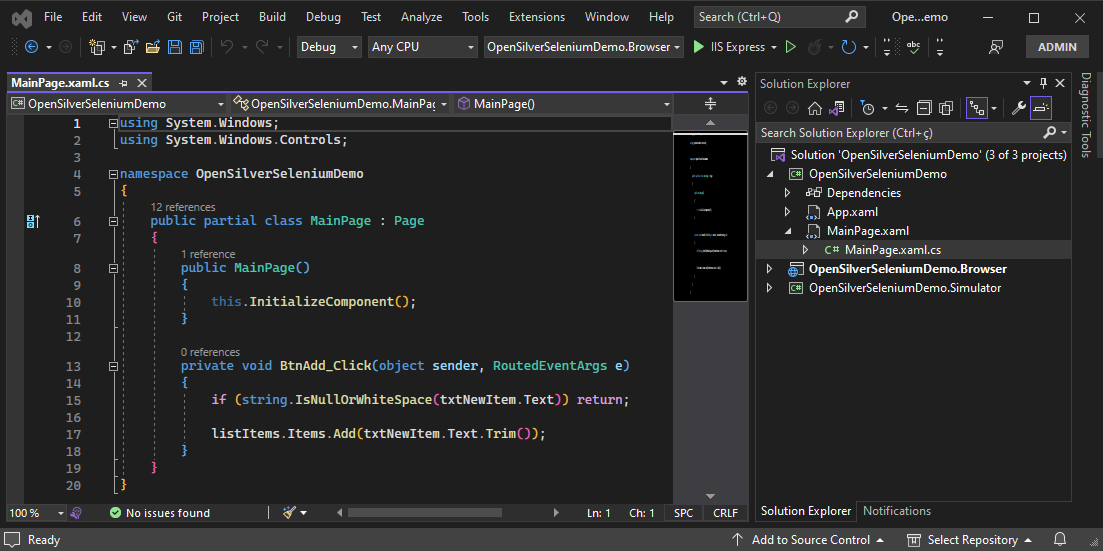
And C# code inside the MainPage.xaml.cs file:
private void BtnAdd_Click(object sender, RoutedEventArgs e)
{
    if (string.IsNullOrWhiteSpace(txtNewItem.Text)) return;

    listItems.Items.Add(txtNewItem.Text.Trim());
}

Let's recompile the solution and launch the project with the suffix ".Browser". The default browser launches and the application runs.
![Working app] Working app](/images/how-to-topics/selenium3.gif)
2. The Selenium Tests Project
Add a new project of type "Web Driver Test for Edge (.NET Core)" to Solution. Keep the original solution name (OpenSilverSeleniumDemo), but append .UiTests at the end.
![Add Selenium Project] Add Selenium Project](/images/how-to-topics/selenium4.gif)
Let's take a look at the new project. Firstly, note that it is using MSTest, but of course, you can use the testing framework that you like more. Secondly, note that it is already included in Selenium.WebDriver nuget. If something goes wrong, you can try to use the versions in the screenshot for each nuget just for the sake of following this guide. Note this test project is generated for the Target Framework netcoreapp2.1, you can try changing to some most recent versions like net6.0, net7.0, or net8.0.
![Inspect Selenium Project] Inspect Selenium Project](/images/how-to-topics/selenium5.png)
Take a look too in the file EdgeDriverTest.cs. Take some time to read it. Follow the instructions to download the correct WebDriver for Microsoft Edge Browser (in this link). Don't forget to include the folder where you saved msedgedriver.exe to PATH as the link asked you to do it.
Finally, let's check if the test is working. Open Test Explorer (menu Test -> Test Explorer), and click the Run button. This will quickly open the Edge window, close and then you will see the green tick in Test Explorer (the test passes!).
If you don't have experience with Selenium WebDriver, you might be confused about what is happening. Just add this line:
Thread.Sleep(5000);
at the end of the method VerifyPageTitle() and execute the test again. You will observe the Edge browser launching, navigating to the Bing website, and subsequently closing. This test just verifies whether the page has the title "Bing".
We have now completed the setup for the Test project. Now let's actually test our OpenSilver page. In the next step, let's change the .Tests project to execute the .Browser project and then run our tests.
3. Adapting the Tests Project
First, let's rename the test class from EdgeDriverTest to OpenSilverSeleniumTests. Second, I will create a private variable to store the app URL, then we move the line that assigns the URL to initialization because all our tests will be in this url, then the VerifyPageTitle() will only assert if the title is correct.
For the next part, we will prepare the test runner to execute ASP.NET Core Blazor in the backend. You can ask yourself why is this needed. Well, Selenium does not care about the technology stack that we are using, it just requires some URL to navigate, and then it will run anything we want. But for any ASP.NET app, we need to run the backend in order to execute the frontend. For example, here I created a brand new MVC app, and executed it to show you what I am talking about:
![Default MVC Web App] Default MVC Web App](/images/how-to-topics/selenium6.gif)
You can see that while the backend is running I can navigate to url, and when the backend stops we can't.
In our case, dotnet.exe will execute the Blazor Server, and the Blazor Server then will execute our app. This server then will be executed only once for all tests (not once per test method). In our guide, we will store the paths in private constants, but depending on your project you can store them in an appsettings file, or calculate via relative paths or other techniques.
![Blazor Server Path] Blazor Server Path](/images/how-to-topics/selenium7.gif)
TIPS:
- For
blazor-devserver.dll, remember to get from the .net version that you are using in the project (in the sample, I got the latest from .Net6.) - For your .browser project dll (in this example,
OpenSilverSeleniumDemo.Browser.dll), remember to get the dll that is in thebinfolder, not in theobjfolder!
Once you got these paths, now paste this code into your test class:
private static Process _server;

[AssemblyInitialize()]
public static void ServerInitialize(TestContext testContext)
{
    _server = Process.Start(
        dotnetPath,
        $"\"{blazorServerPath}\" --applicationpath \"{appPath}\" --urls={appUrl}");
}

[AssemblyCleanup]
public static void TearDown()
{
    _server?.Kill();
}
In MSTest, the method with AssemblyInitialize attribute will execute once per test run, and with AssemblyCleanup will execute once when all tests are finished. If you are using another test framework, use the equivalent feature. For example, in NUnit, you will use OneTimeSetUp and OneTimeTearDown methods.
In the ServerInitialize, we execute dotnet.exe, which executes Blazor server, which executes our OpenSilver app. We store that process variable and then, in AssemblyCleanup, we kill the process.
Now, update the appUrl to something pointing to localhost, for example, "http://localhost:55777".
Then, update the VerifyPageTitle() to check the title of our app, in this case, OpenSilverSeleniumDemo.
This is enough for our first test. You can go to Test Explorer and click the Run button. If everything goes well, you will see a green tick in VerifyPageTitle() test method.
4. UI Tests with Selenium
Firstly, let's add a Wait. A Wait is an object from Selenium to help you wait for expected conditions. The full explanation is out of the scope of this guide, but it is enough for you to know that we will use it to check if the page is loaded, and for this, we will just check if the text "Add Items" is already present on the page. Let's declare it as a private field:
private WebDriverWait _wait;
and let's instantiate it in EdgeDriverInitialize():
_wait = new WebDriverWait(_driver, TimeSpan.FromSeconds(10));
Finally, let's create our first test method. Let's check if all the controls that we defined in the Xaml file are present on the page.
[TestMethod]
public void VerifyAllControlsAreLoaded()
{
    var label = _wait.Until(d => d.FindElement(By.XPath("//*[contains(text(),'Add Items')]")));

    var txtNewItem = _driver.FindElements(By.CssSelector("[dataid='txtNewItem']")).FirstOrDefault();
    var btnAdd = _driver.FindElements(By.CssSelector("[dataid='btnAdd']")).FirstOrDefault();
    var listItems = _driver.FindElements(By.CssSelector("[dataid='listItems']")).FirstOrDefault();

    Assert.IsNotNull(label, "Add Items label");
    Assert.IsNotNull(txtNewItem, "txtNewItem");
    Assert.IsNotNull(btnAdd, "btnAdd");
    Assert.IsNotNull(listItems, "listItems");
}
In the first line, we use the Wait to try to find, in XPath language "an element containing the text 'Add Items'". It will try it for 10 seconds, and when it finally finds it we know that the page is loaded. Then we proceed to find our next elements. Because in Xaml we used x:Name, OpenSilver outputs that in dataid attributes, then we just need the right CssSelector to find them.
TIP: Try changing the test then it fails. For example, using the wrong dataid for some element. Then, fix the test, but now change some element x:Name in Xaml (rebuild the solution) and test it again.
5. An advanced UI Test
Let's type something in the textbox, click on the add button and check if this was added to the listbox. Here is the code:
[TestMethod]
public void VerifyWeCanAddAnItem()
{
    const string sampleText = "OpenSilver Rocks!";

    // wait until the page is loaded
    _wait.Until(d => d.FindElement(By.XPath("//*[contains(text(),'Add Items')]")));

    // get element references
    var txtNewItem = _wait.Until(e => e.FindElement(By.CssSelector("[dataid='txtNewItem']")));
    var btnAdd = _wait.Until(e => e.FindElement(By.CssSelector("[dataid='btnAdd']")));
    var listItems = _wait.Until(e => e.FindElement(By.CssSelector("[dataid='listItems']")));

    // type the sample text in the textbox
    txtNewItem
        .FindElement(By.CssSelector("[contenteditable='true']")) // OpenSilver 1.x
        //.FindElement(By.TagName("textarea")) // OpenSilver 2.x
        .SendKeys(sampleText);

    btnAdd.Click();

    var listItem = listItems.FindElements(By.XPath($"//*[contains(text(),'{sampleText}')]")).FirstOrDefault();

    Assert.IsNotNull(listItem);
}
- First, we wait until the page is loaded using the Wait object;
- Then we use the same technique from the past test, to get the Xaml Elements references;
- Next, we type in the textbox. Note that we need to find a
contenteditable(or atextareafor OpenSilver 2.x) inside of the textbox. This happens because OpenSilver's textbox is not a plain Html textbox, it is a far more powerful and complex control in order to replicate the features of Xaml Textbox; - We just click the button;
- Now we search, inside of the listbox, if we have some element containing the text that we added from the textbox
Run the tests, and everything happens really fast! If you want to see each step happening in the browser, a common technique is to debug the test with breakpoints, or put Thread.Sleep(5000); between each line of code (but make sure to remove in the final code).
6. Summary
You can get the complete source code for that article here.
If you liked this article, and you become interested in web application development with OpenSilver using Selenium for UI testing, and you want to know more and get support in this matter, please contact us!
